
✔︎ 웹 애플리케이션과 싱글톤
'개발 > spring' 카테고리의 다른 글
| [스프링] 스프링 컨테이너와 스프링 빈 (0) | 2024.04.25 |
|---|---|
| [스프링] 스프링 핵심 원리 - 기본편 2 (0) | 2023.11.27 |
| [스프링] 스프링 핵심 원리 - 기본편 1 (0) | 2023.11.27 |
| [스프링] start (0) | 2023.11.06 |
✔︎ 웹 애플리케이션과 싱글톤
| [스프링] 스프링 컨테이너와 스프링 빈 (0) | 2024.04.25 |
|---|---|
| [스프링] 스프링 핵심 원리 - 기본편 2 (0) | 2023.11.27 |
| [스프링] 스프링 핵심 원리 - 기본편 1 (0) | 2023.11.27 |
| [스프링] start (0) | 2023.11.06 |
✔︎ 스프링 컨테이너 생성
컨테이너에 등록된 빈 조회
hello.core.beanfind.ApplicationContextInfoTest.java
- 27줄에 ac.getBeandDefinition(beanDefinitionName) → bean에 대한 metadate 정보
- spring이 내부에서 사용하는 빈은 getRole()로 구분 가능

★ soutm → system.out.println 단축키
✔︎ 스프링 빈 조회 - 기본
ApplicationContextBasicFindTest.java
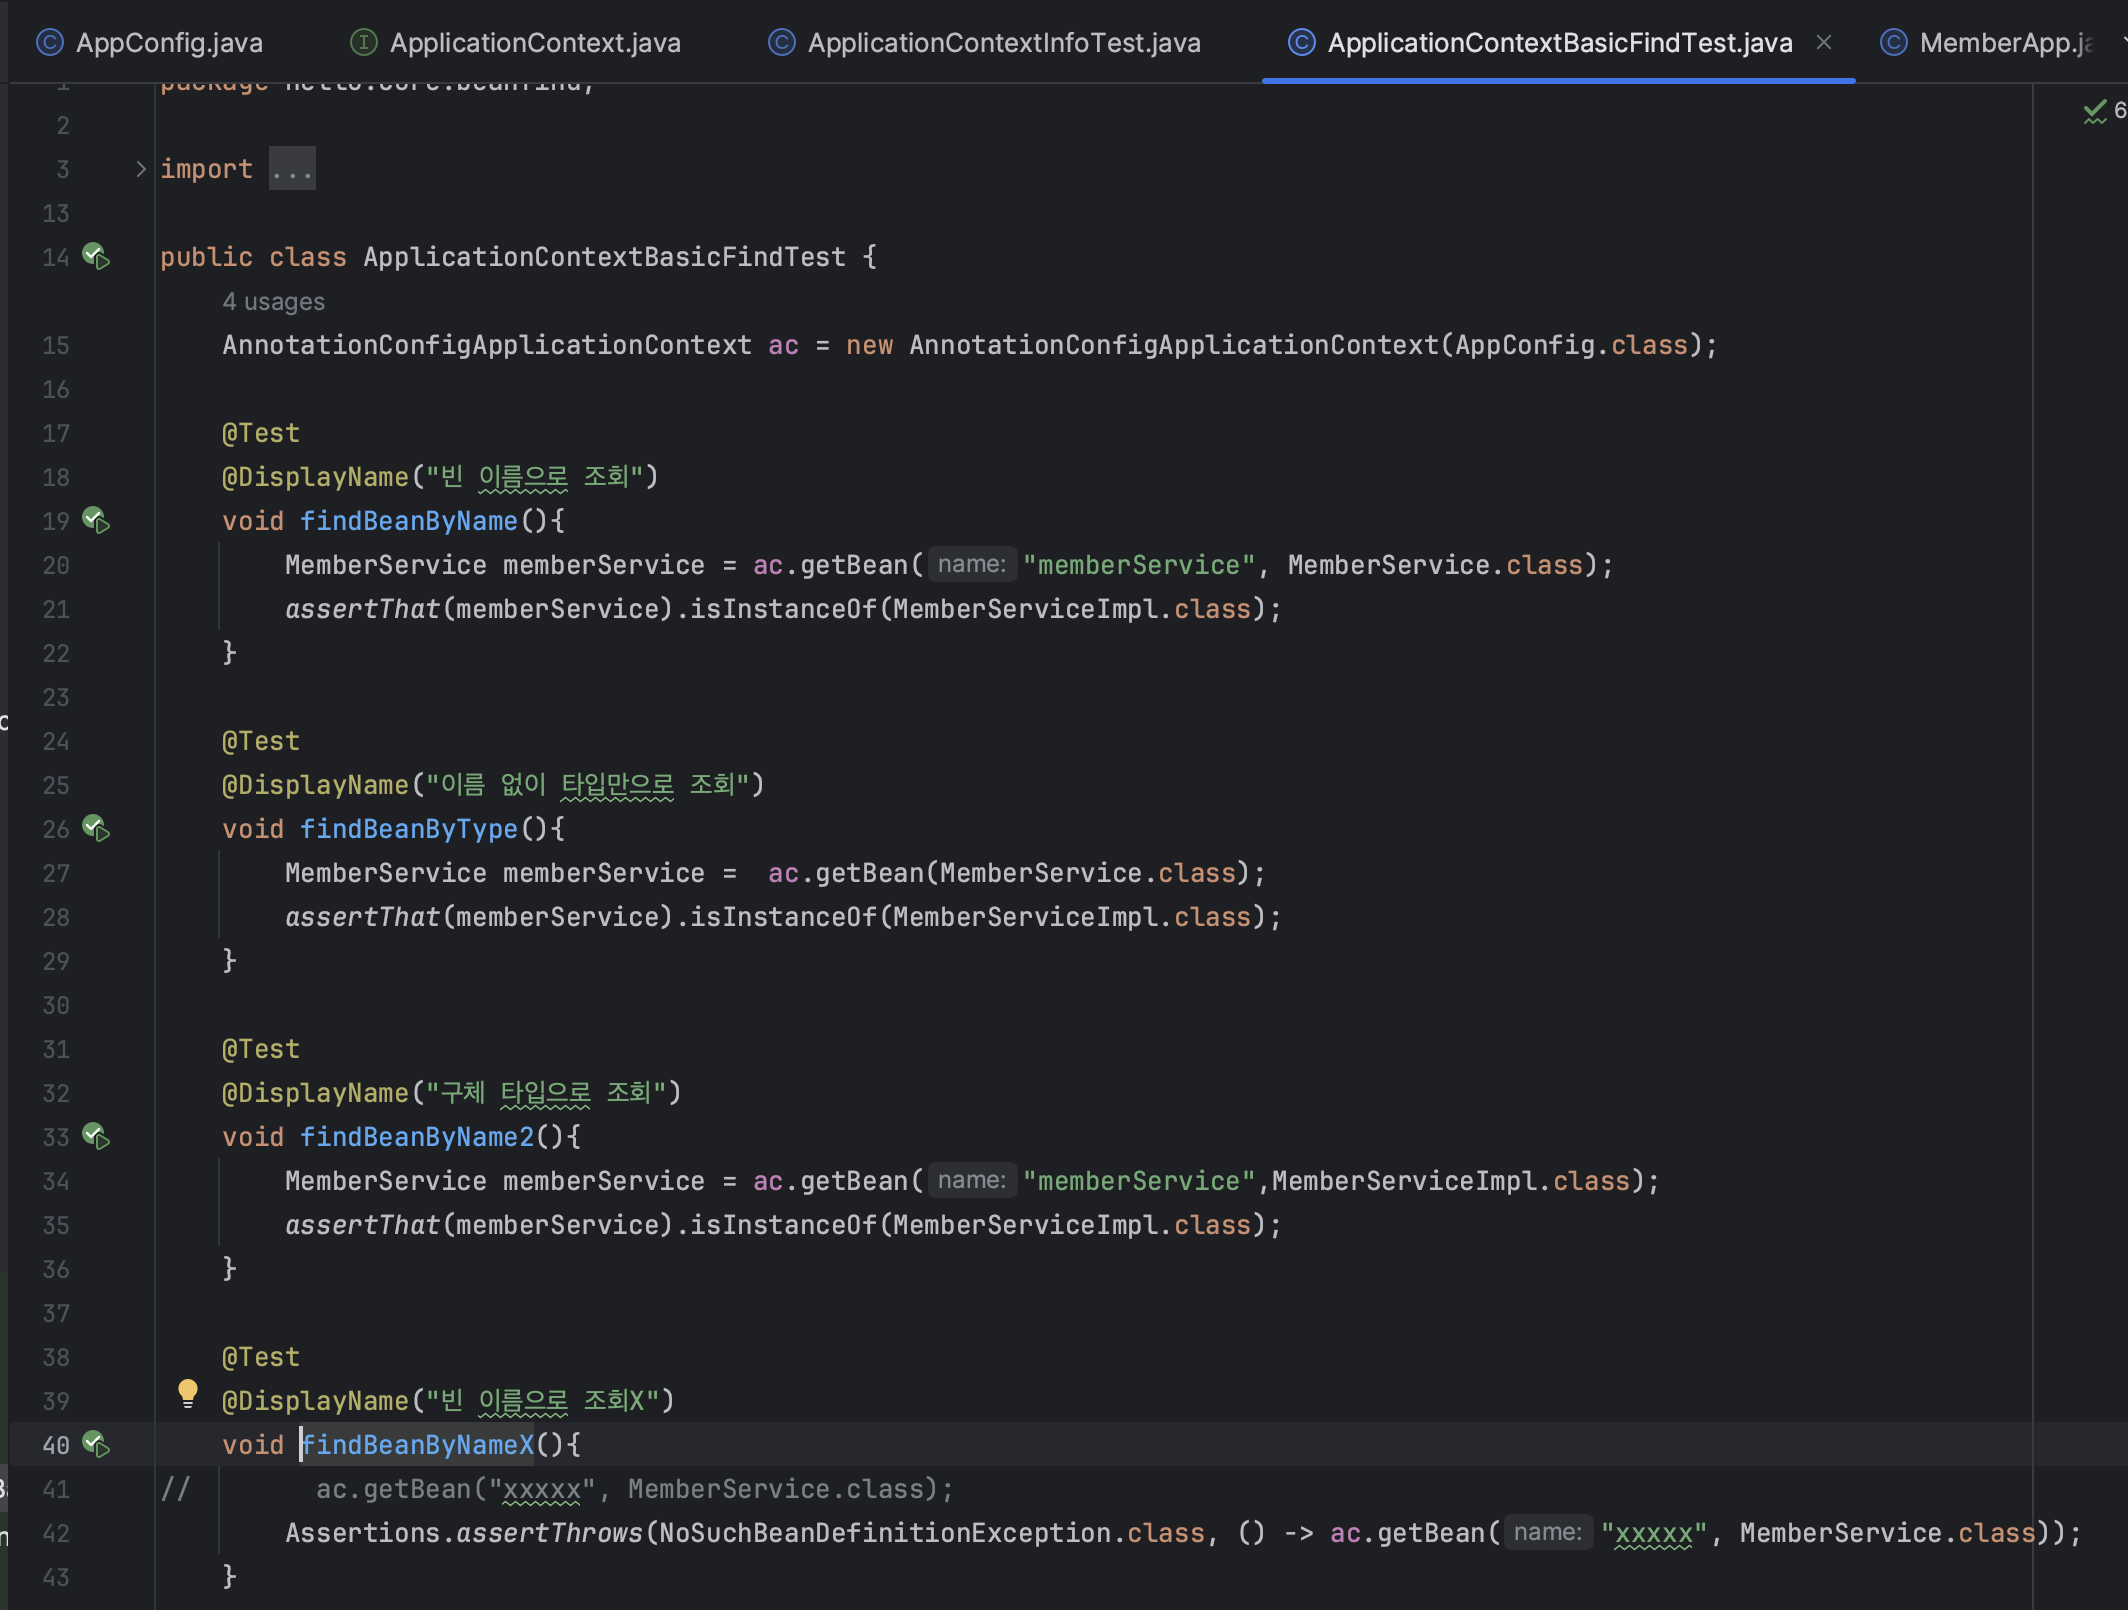
- assertThat같은 경우는 검증하는것
- asserThat의 경우 Assertions.assertThat에서 option+enter해서 on-demand로 Assertions를 없앰 (줄임말)
- 항상 test를 할때는 실패 test도 있어야해서 빈 이름으로 조회X test도 진행함
- 마지막 빈 이름으로 조회X부분에서는 () -> 뒷부분의 로직을 실행했을때 앞의 예외가 던져져야 함
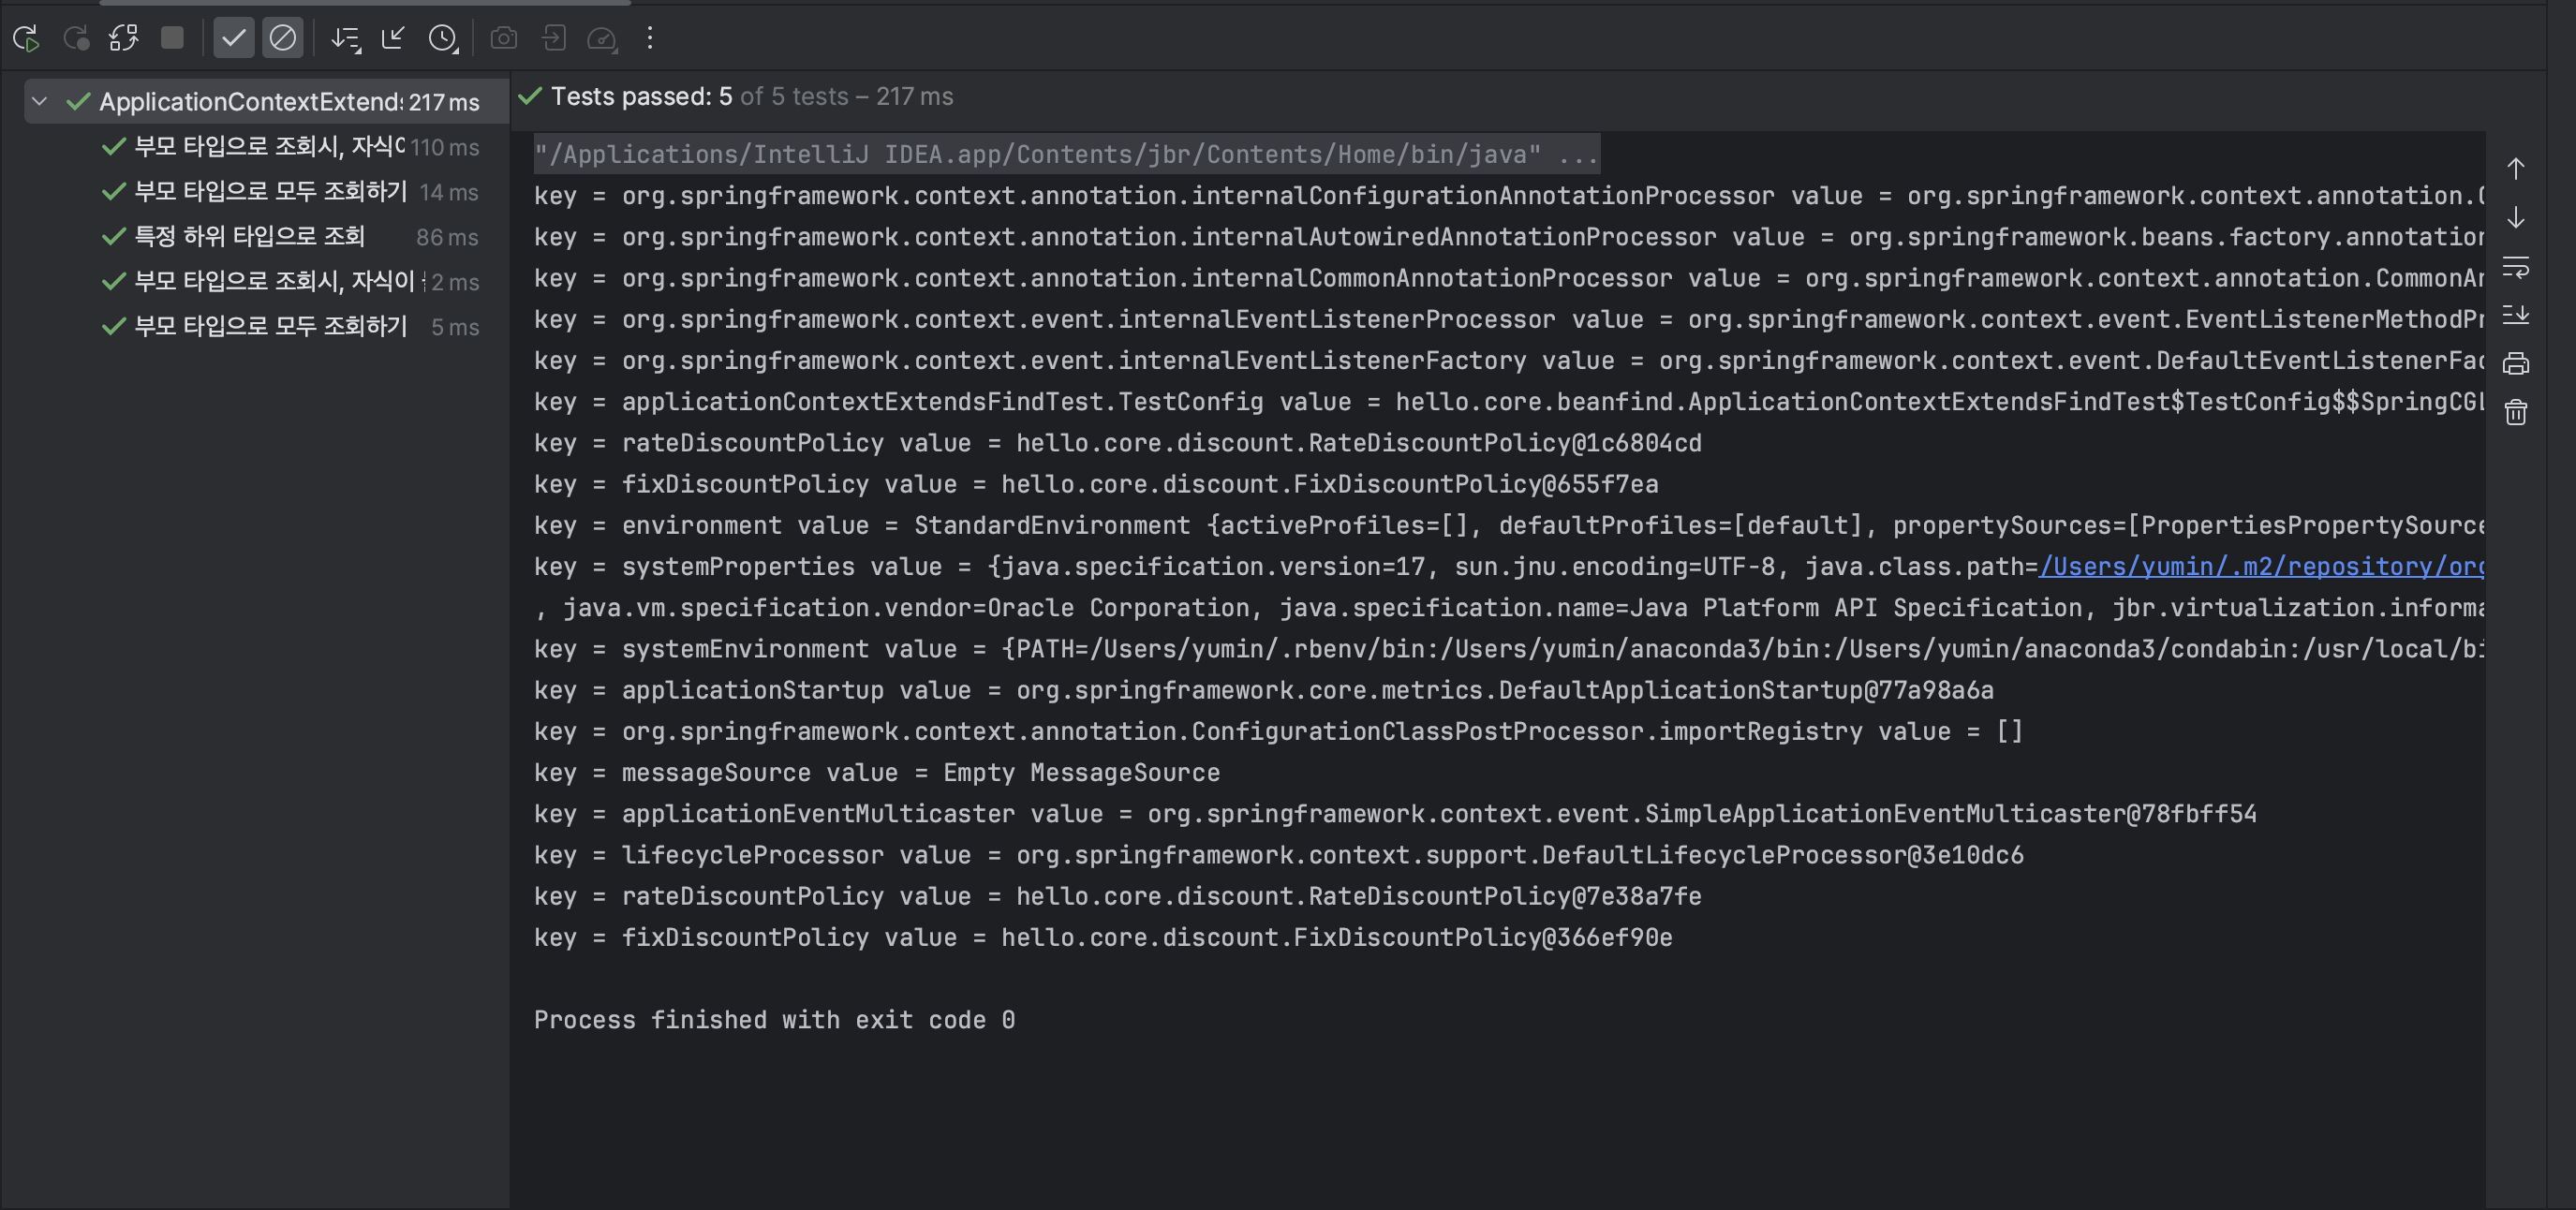
✔︎ 스프링 빈 조회 - 동일한 타입이 둘 이상부터 시작
ApplicationContextSameBeanFindTest.java
package hello.core.beanfind;

import hello.core.member.MemberRepository;
import hello.core.member.MemoryMemberRepository;
import org.junit.jupiter.api.DisplayName;
import org.junit.jupiter.api.Test;
import org.springframework.beans.factory.NoUniqueBeanDefinitionException;
import org.springframework.context.annotation.AnnotationConfigApplicationContext;
import org.springframework.context.annotation.Bean;
import org.springframework.context.annotation.Configuration;

import java.util.Map;

import static org.assertj.core.api.Assertions.assertThat;
import static org.junit.jupiter.api.Assertions.assertThrows;

public class ApplicationContextSameBeanFindTest {
    AnnotationConfigApplicationContext ac = new AnnotationConfigApplicationContext(SameBeanConfig.class);

    @Test
    @DisplayName("타입으로 조회시 같은 타입이 둘 이상 있으면, 중복 오류가 발생한다")
    void findBeanByTypeDuplicate(){
//        MemberRepository bean = ac.getBean(MemberRepository.class);
        assertThrows(NoUniqueBeanDefinitionException.class, () -> ac.getBean(MemberRepository.class));

    }

    @Test
    @DisplayName("타입으로 조회시 같은 타입이 둘 이상 있으면, 빈 이름을 지정하면 된다")
    void findBeanByName(){
        MemberRepository memberRepository = ac.getBean("memberRepository1", MemberRepository.class);
        assertThat(memberRepository).isInstanceOf(MemberRepository.class);
    }

    @Test
    @DisplayName("특정 타입을 모두 조회하기")
    void findAllBeanByType(){
        Map<String, MemberRepository> beansOfType = ac.getBeansOfType(MemberRepository.class);
        for(String key : beansOfType.keySet()){
            System.out.println("key = " + key + " value = " + beansOfType.get(key));
        }
        System.out.println("beansOfType = " + beansOfType);
        assertThat(beansOfType.size()).isEqualTo(2);
    }

    @Configuration
    static class SameBeanConfig{
        @Bean
        public MemberRepository memberRepository1(){
            return new MemoryMemberRepository();
        }

        @Bean
        public MemberRepository memberRepository2(){
            return new MemoryMemberRepository();
        }

    }

}
- getBean에서 option+command+v → 앞부분 자동완성
★ command + shifht + enter → 자동 세미콜론 생성

✔︎ 스프링 빈 조회 - 상속 관계
ApplicationContextExtendsFindTest.java
package hello.core.beanfind;

import hello.core.discount.DiscountPolicy;
import hello.core.discount.FixDiscountPolicy;
import hello.core.discount.RateDiscountPolicy;
import org.junit.jupiter.api.DisplayName;
import org.junit.jupiter.api.Test;
import org.springframework.beans.factory.NoUniqueBeanDefinitionException;
import org.springframework.context.annotation.AnnotationConfigApplicationContext;
import org.springframework.context.annotation.Bean;
import org.springframework.context.annotation.Configuration;

import java.util.Map;

import static org.assertj.core.api.Assertions.assertThat;
import static org.junit.jupiter.api.Assertions.assertThrows;

public class ApplicationContextExtendsFindTest {
    AnnotationConfigApplicationContext ac = new AnnotationConfigApplicationContext(TestConfig.class);

    @Test
    @DisplayName("부모 타입으로 조회시, 자식이 둘 이상 있으면, 중복 오류가 발생한다")
    void findBeanByParentTypeDuplicate(){
//        DiscountPolicy bean = ac.getBean(DiscountPolicy.class);
        assertThrows(NoUniqueBeanDefinitionException.class, () -> ac.getBean(DiscountPolicy.class));
    }

    @Test
    @DisplayName("부모 타입으로 조회시, 자식이 둘 이상 있으면, 빈 이름을 지정하면 된다")
    void findBeanByParentTypeBeanName(){
        DiscountPolicy rateDiscountPolicy = ac.getBean("rateDiscountPolicy", DiscountPolicy.class);
        assertThat(rateDiscountPolicy).isInstanceOf(RateDiscountPolicy.class);
    }

    @Test
    @DisplayName("특정 하위 타입으로 조회")
    void findBeanBySubType(){
        RateDiscountPolicy bean = ac.getBean(RateDiscountPolicy.class);
        assertThat(bean).isInstanceOf(RateDiscountPolicy.class);
    }

    @Test
    @DisplayName("부모 타입으로 모두 조회하기")
    void findAllBeanByParentType(){
        Map<String, DiscountPolicy> beansOfType = ac.getBeansOfType(DiscountPolicy.class);
//        beansOfType의 사이즈가 2개면 성공
        assertThat(beansOfType.size()).isEqualTo(2);
        for (String key : beansOfType.keySet()){
            System.out.println("key = " + key + " value = " + beansOfType.get(key));
        }
    }

    @Test
    @DisplayName("부모 타입으로 모두 조회하기 - Object")
    void findAllBeanByObjectType(){
        Map<String, Object> beansOfType = ac.getBeansOfType(Object.class);
        for(String key : beansOfType.keySet()){
            System.out.println("key = " + key + " value = " + beansOfType.get(key));
        }
    }

    @Configuration
    static class TestConfig{
        @Bean
        public DiscountPolicy rateDiscountPolicy(){
            return new RateDiscountPolicy();
        }

        @Bean
        public DiscountPolicy fixDiscountPolicy(){
            return new FixDiscountPolicy();
        }
    }
}
✔︎ BeanFactory와 ApplicationContext
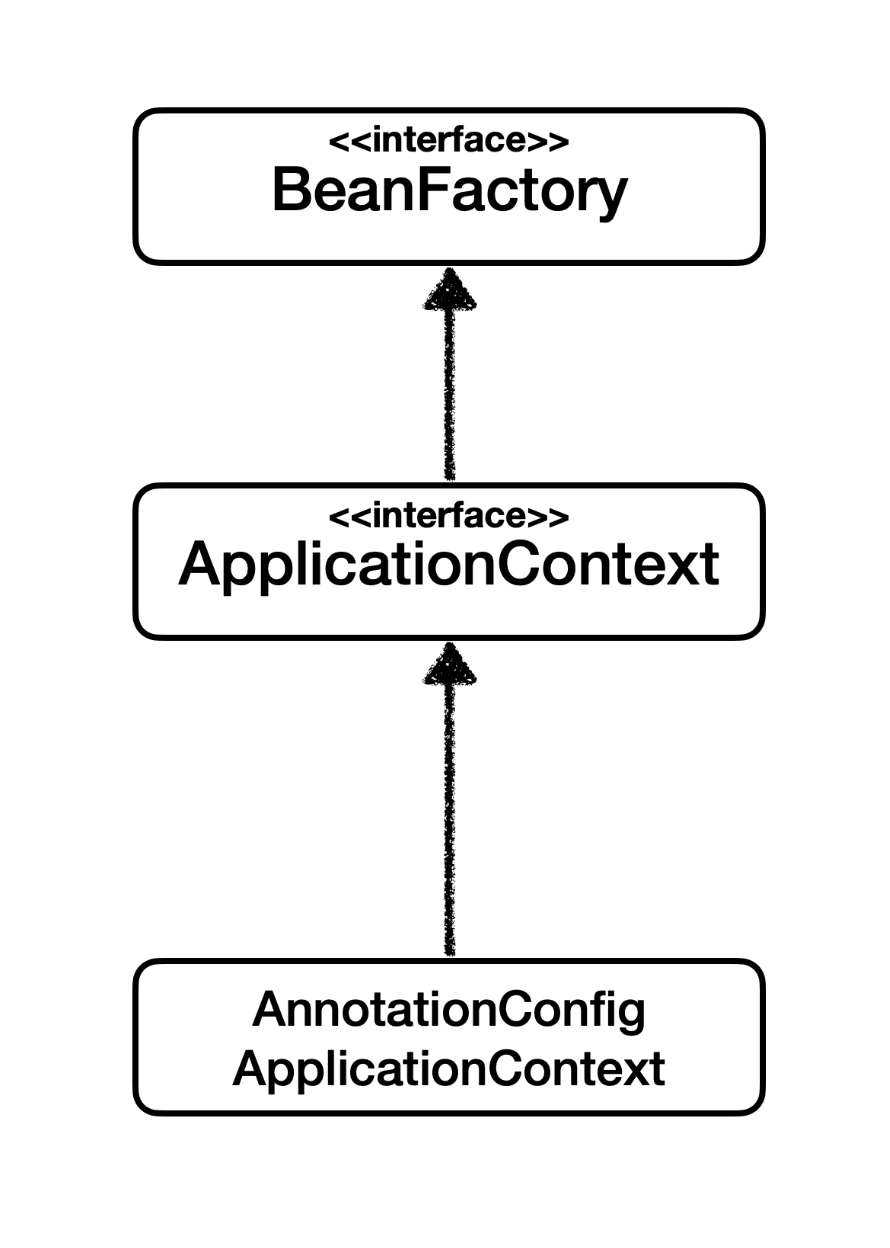
- BeanFactory
- ApplicationContext

➜ 결론
- ApplicationContext는 빈 관리기능 + 편리한 부가기능 제공
- BeanFactory나 ApplicationContext를 스프링 컨테이너라고 부름
✔︎ 다양한 설정 형식 지원 - 자바 코드, XML
XmlAppContext.java


- GenericXml ← xml이라는 문서를 설정정보로 사용
src/main/resources/appConfig.xml

- new-xml configuration file-spring config 에서 파일 생성
- <bean></bean> 빈 등록
✔︎ 스프링 빈 설정 메타 정보 - BeanDefinition
- BeanDefinition
BeanDefinitionTest.java

| [스프링] 싱글톤 컨테이너 (0) | 2024.04.26 |
|---|---|
| [스프링] 스프링 핵심 원리 - 기본편 2 (0) | 2023.11.27 |
| [스프링] 스프링 핵심 원리 - 기본편 1 (0) | 2023.11.27 |
| [스프링] start (0) | 2023.11.06 |

✔︎권장사항
- java 11
- IntelliJ
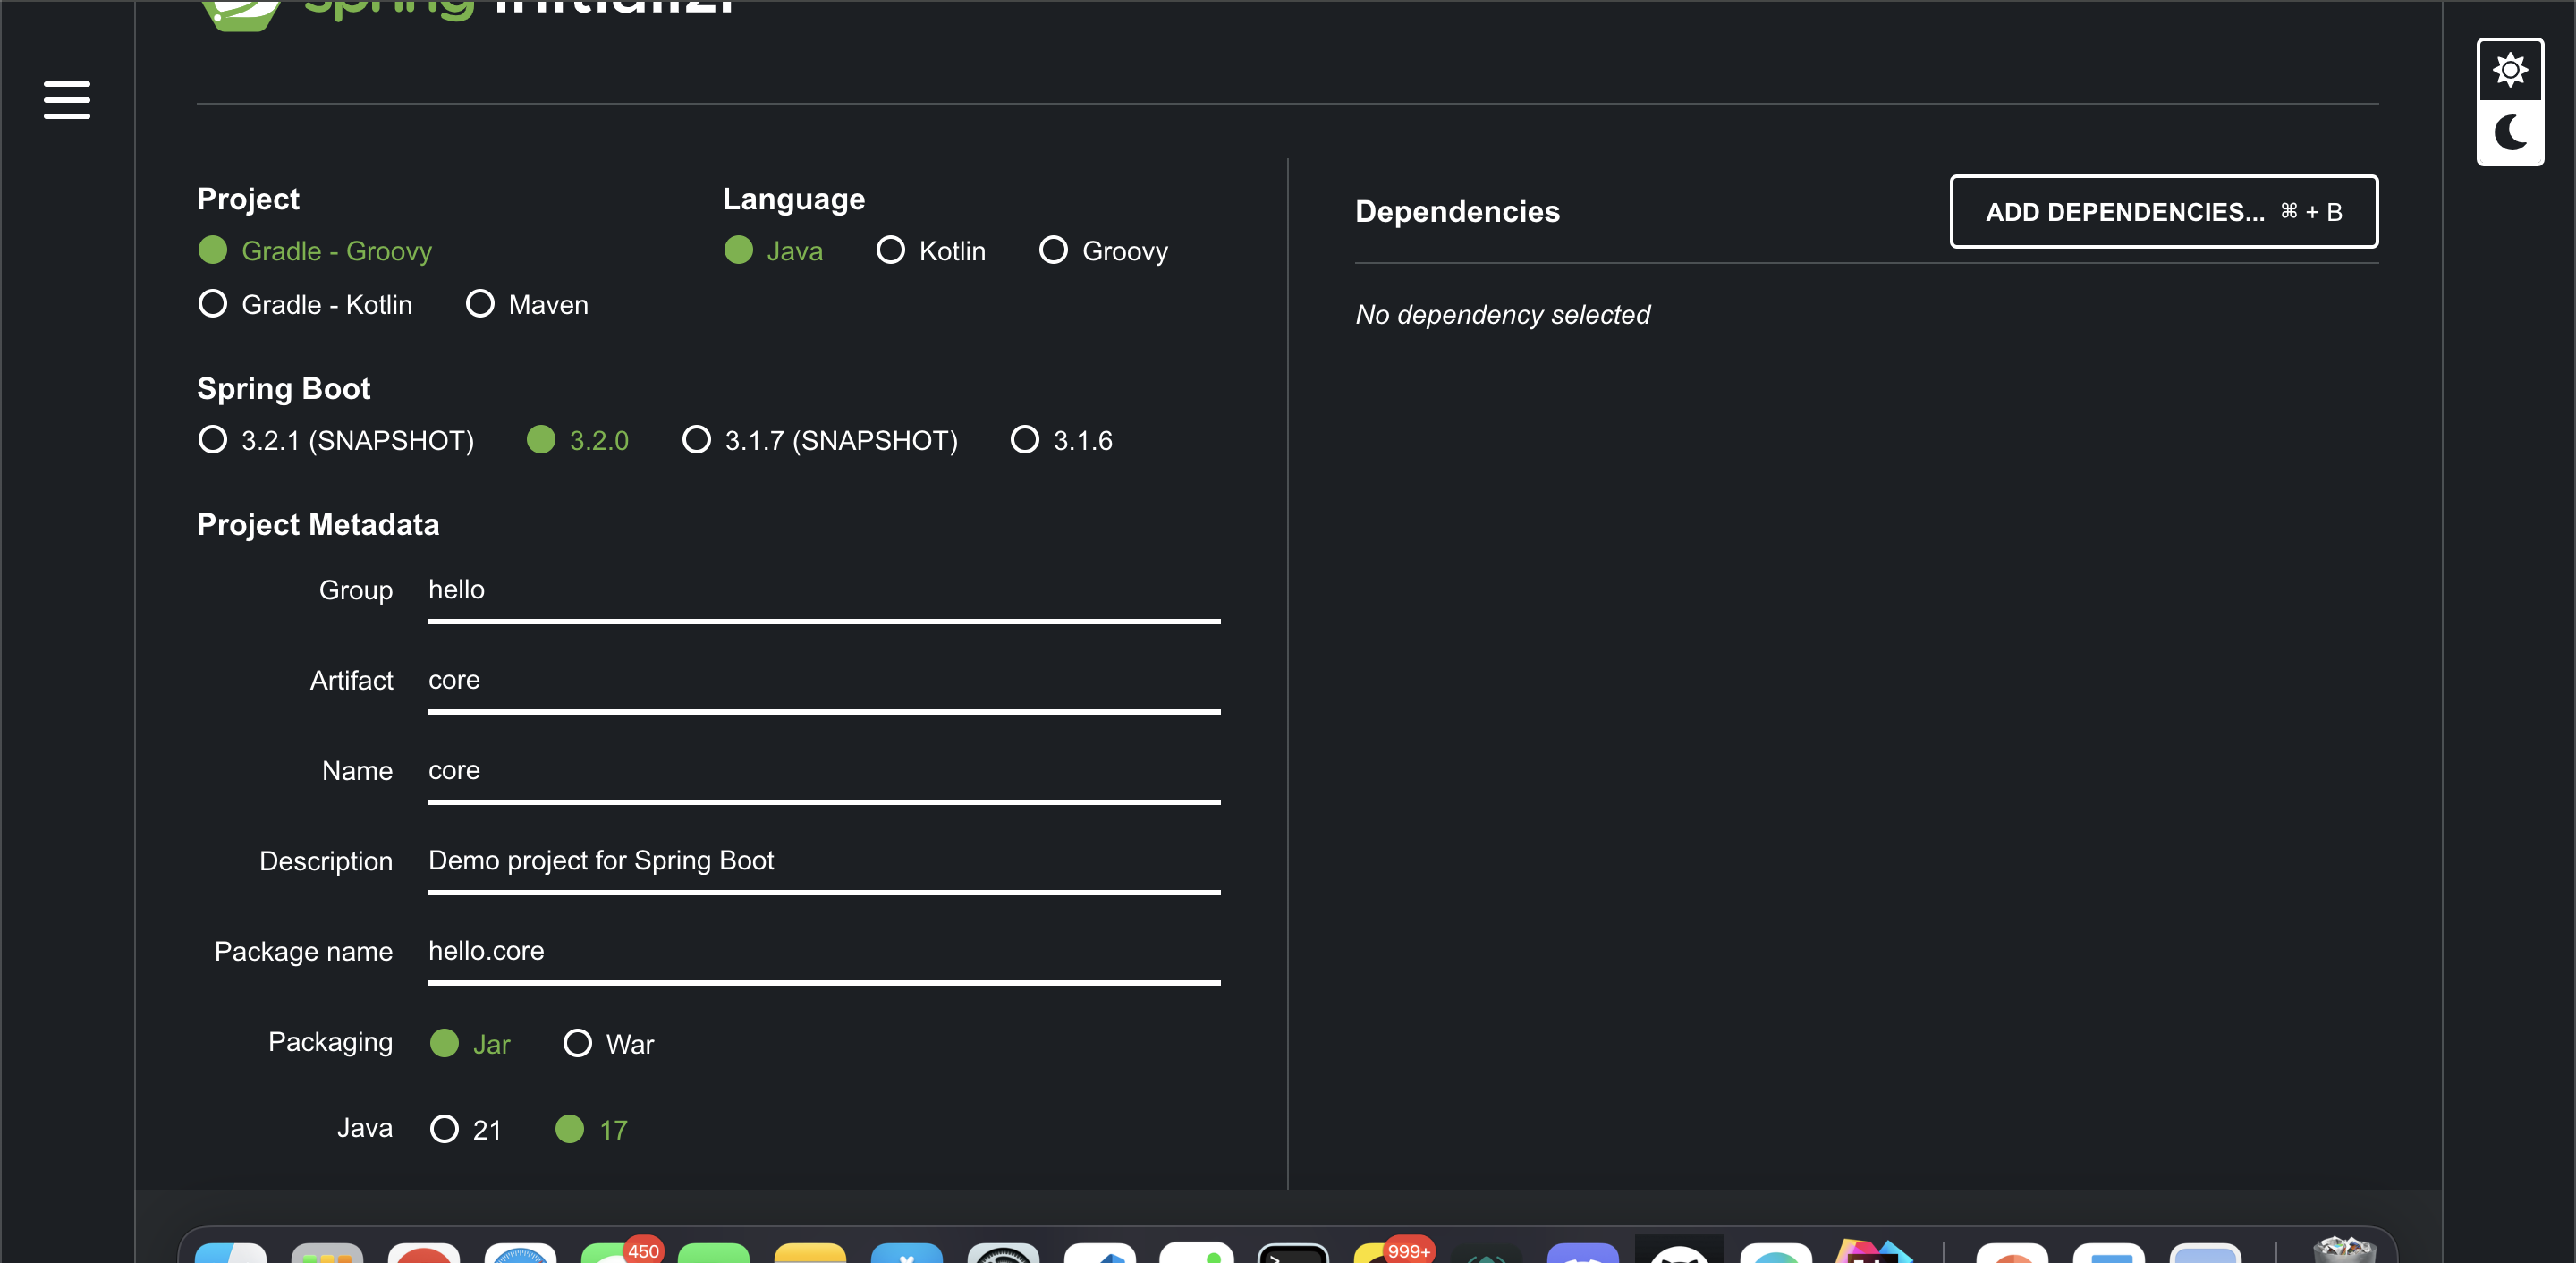
✔︎스프링부트 스타터에서 프젝 생성
시작하려고보니 자바 버전이 21 17밖에 없어서 버전을 먼저 맞추려고 한다.
✔︎설치되어 있는 모든 자바 버전 확인
$ /usr/libexec/java_home -V

✔︎java17 설치
https://www.oracle.com/java/technologies/downloads/#jdk17-mac

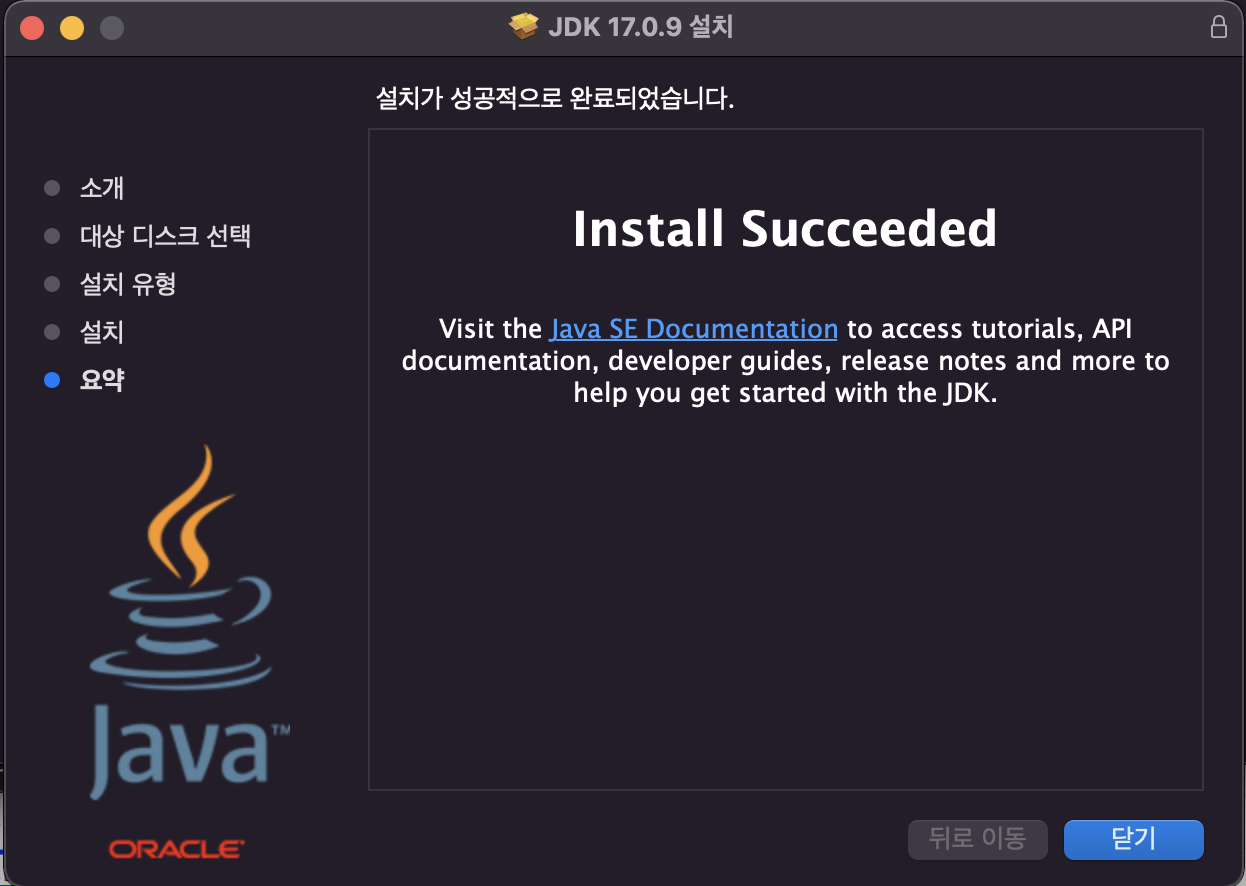
버전 확인
$ java -version

✔︎프로젝트 생성
✔︎파일구조

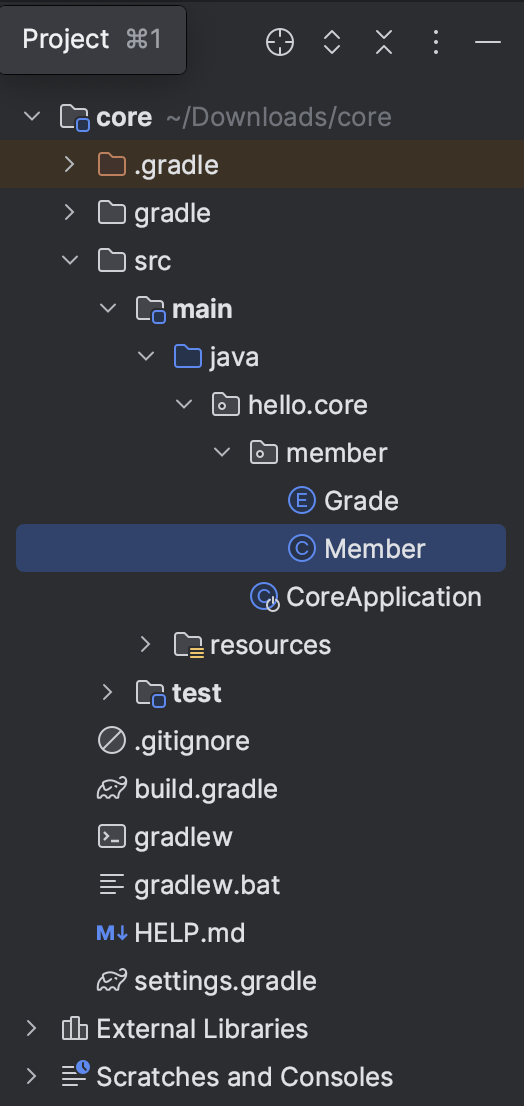
Compact패키지일때는 hello.core의 hello 폴더에 뭘 생성하기 어렵다고함

인터페이스와 구현체를 같은 패키지에 두는 것보다는 따로 두는게 설계상 좋음
★자동완성
세미콜론까지 자동완성 시켜주는 단축키 : Command + Shift + Enter
public state void main 자동완성 : psvm
getter/setter 자동완성 : command + N
System.out.println 자동완성 : sout

✔︎return으로 주문결과 반환

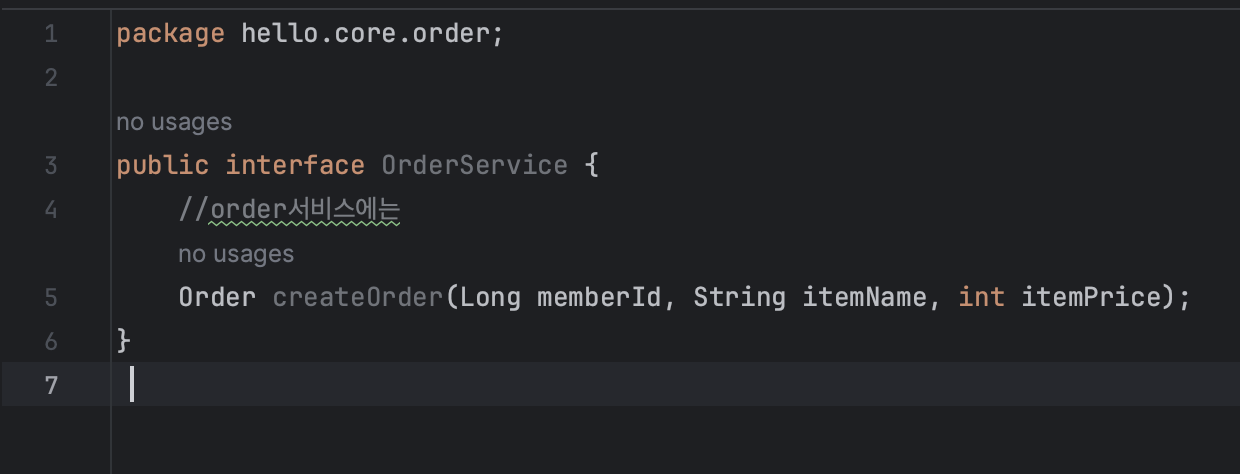
src/main/java/hello.core/order/OrderService.java
src/main/java/hello.core/order/OrderApp.java
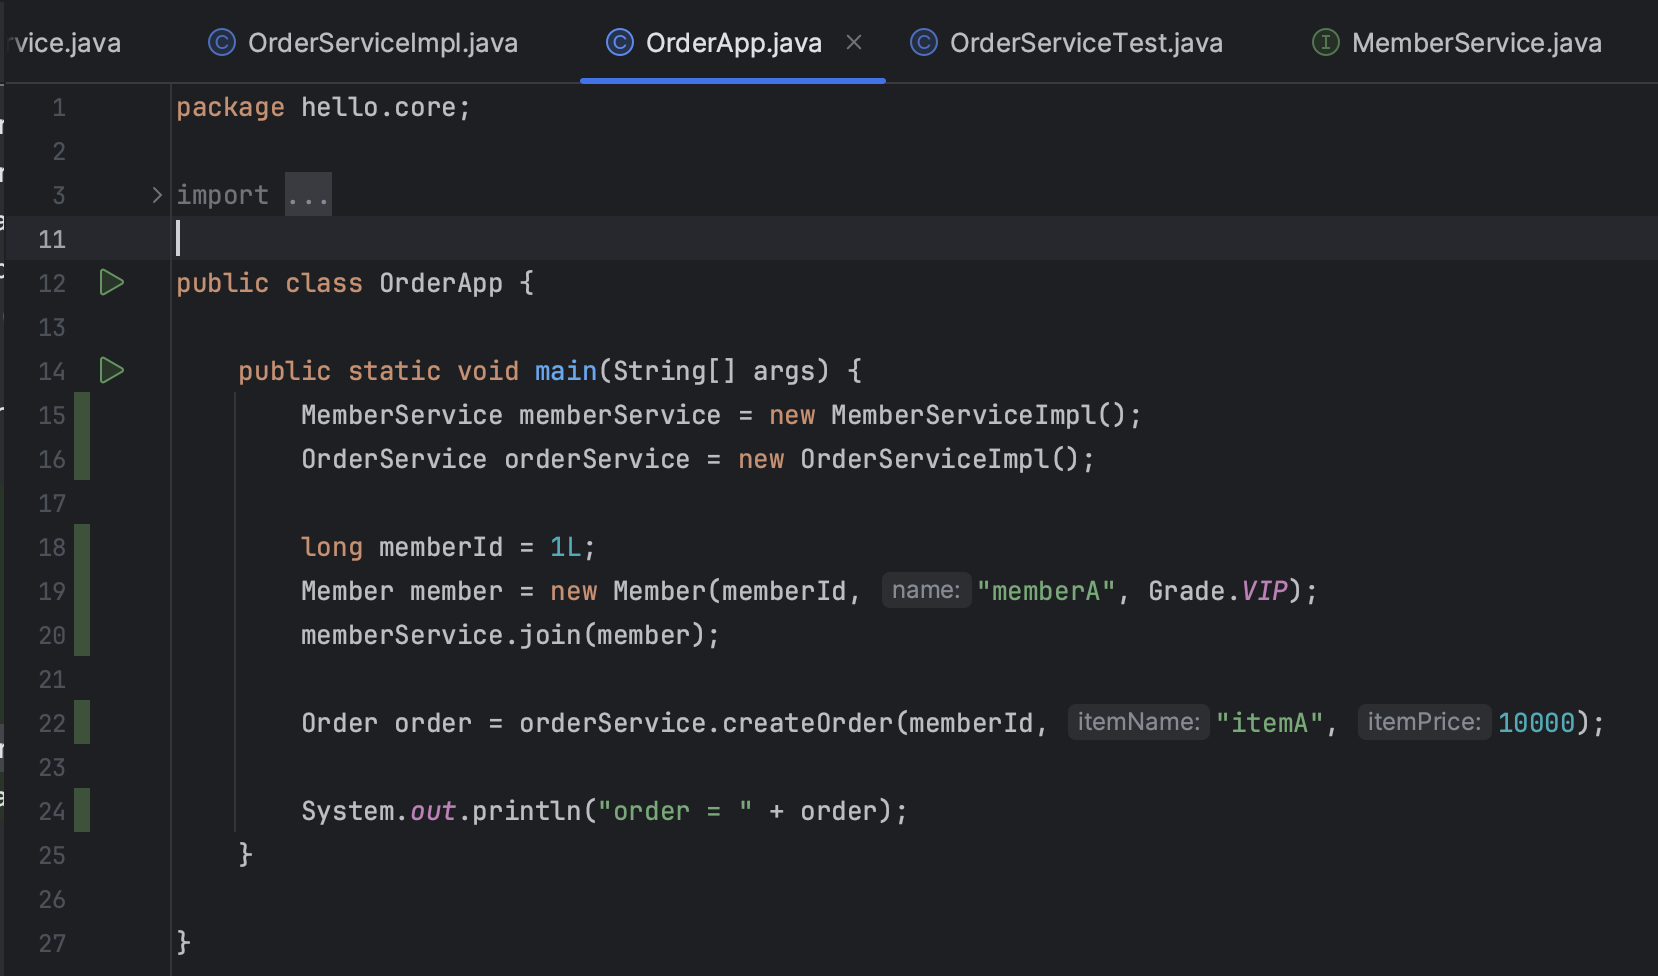

주문 도메인 전체에 대한 구현 완료
정액 할인 정책을 정률로 바꾸었을 때 클라이언트에 영향을 주지 않는지 역할이 잘 분리되었는지 확인 해볼 예정임
✔︎ 새로운 할인 정책 개발
core.discount.DiscountPolicy
package hello.core.discount;

import hello.core.member.Member;

public interface DiscountPolicy {

//    @return 할인 대상 금액
    int discount(Member member, int price);
}
core.discount.FixDiscountPolicy
package hello.core.discount;

import hello.core.member.Grade;
import hello.core.member.Member;

public class FixDiscountPolicy implements DiscountPolicy{

    private int discountFixAmount = 1000; //1000원 할인
    //VIP일경우 1000원 할인 아니면 할인x
    @Override
    public int discount(Member member, int price) {
        if (member.getGrade() == Grade.VIP){
            return discountFixAmount;
        } else {
        return 0;
        }
    }
}
core.discount.RateDiscountPolicy
package hello.core.discount;

import hello.core.member.Grade;
import hello.core.member.Member;

public class RateDiscountPolicy implements DiscountPolicy{

    private int discountPercent = 10;

    @Override
    public int discount(Member member, int price) {
        if(member.getGrade() == Grade.VIP){ //멤버등급이 vip일 경우
            return price * discountPercent / 100;
        } else {
            return 0;
        }
    }
}
✔︎ 새로운 할인 정책 적용과 문제점
- 적용시키기 위해서는 order.OrderServiceImpl 에서 적용시켜야함
order.OrderServiceImpl
- FixDiscountPolicy를 RateDiscountPolicy로 바꿔주어야 함
package hello.core.order;
import hello.core.discount.DiscountPolicy;
import hello.core.discount.FixDiscountPolicy;
import hello.core.discount.RateDiscountPolicy;
import hello.core.member.Member;
import hello.core.member.MemberRepository;
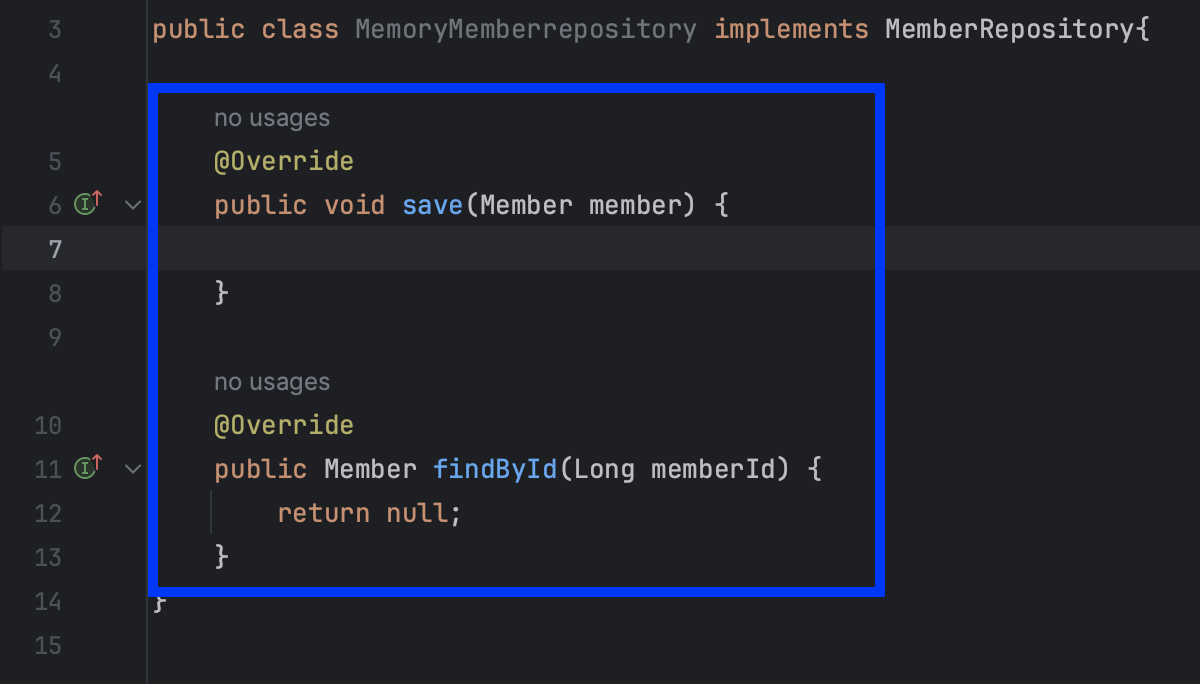
import hello.core.member.MemoryMemberrepository;
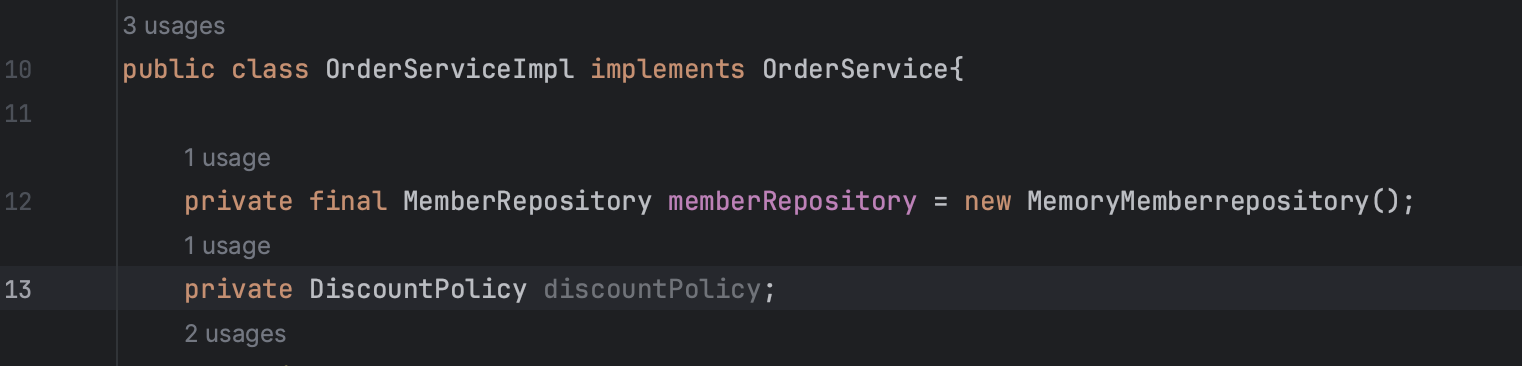
public class OrderServiceImpl implements OrderService{
private final MemberRepository memberRepository = new MemoryMemberrepository();
//private final DiscountPolicy discountPolicy = new FixDiscountPolicy();
private final DiscountPolicy discountPolicy = new RateDiscountPolicy();
@Override
public Order createOrder(Long memberId, String itemName, int itemPrice) {
//member 찾음
Member member = memberRepository.findById(memberId);
//단일책임의 원칙 잘 지켜짐 할인정책에 문제가 있을때 할인정책만 수정 가능
int discountPrice = discountPolicy.discount(member, itemPrice);
return new Order(memberId, itemName, itemPrice, discountPrice);
}
}
- 할인정책을 변경하기 위해서는 클라이언트인 OrderServiceImpl
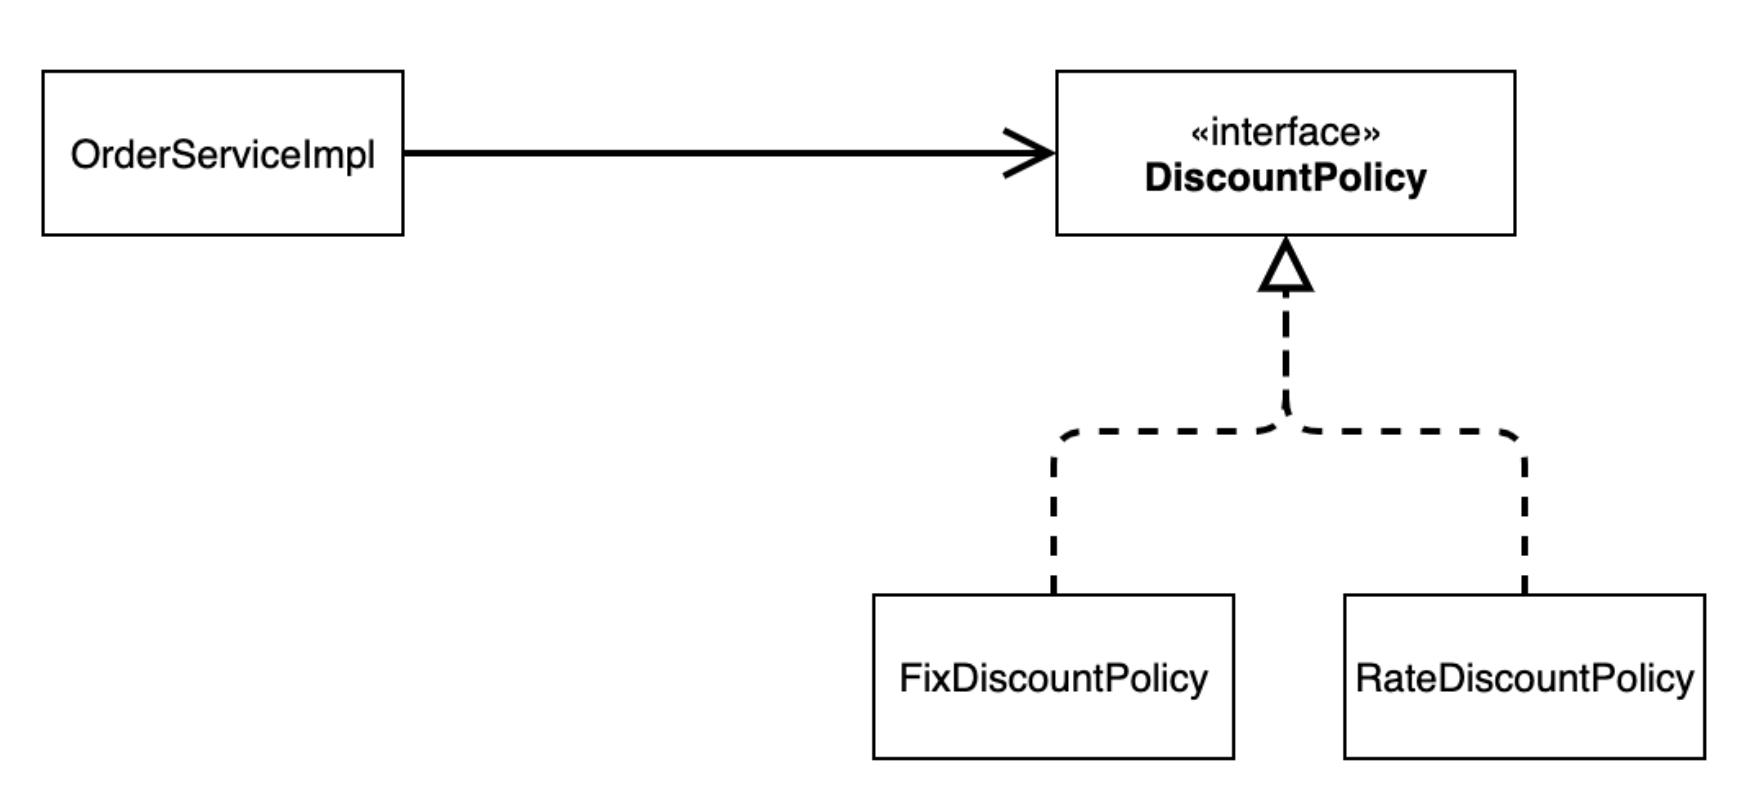
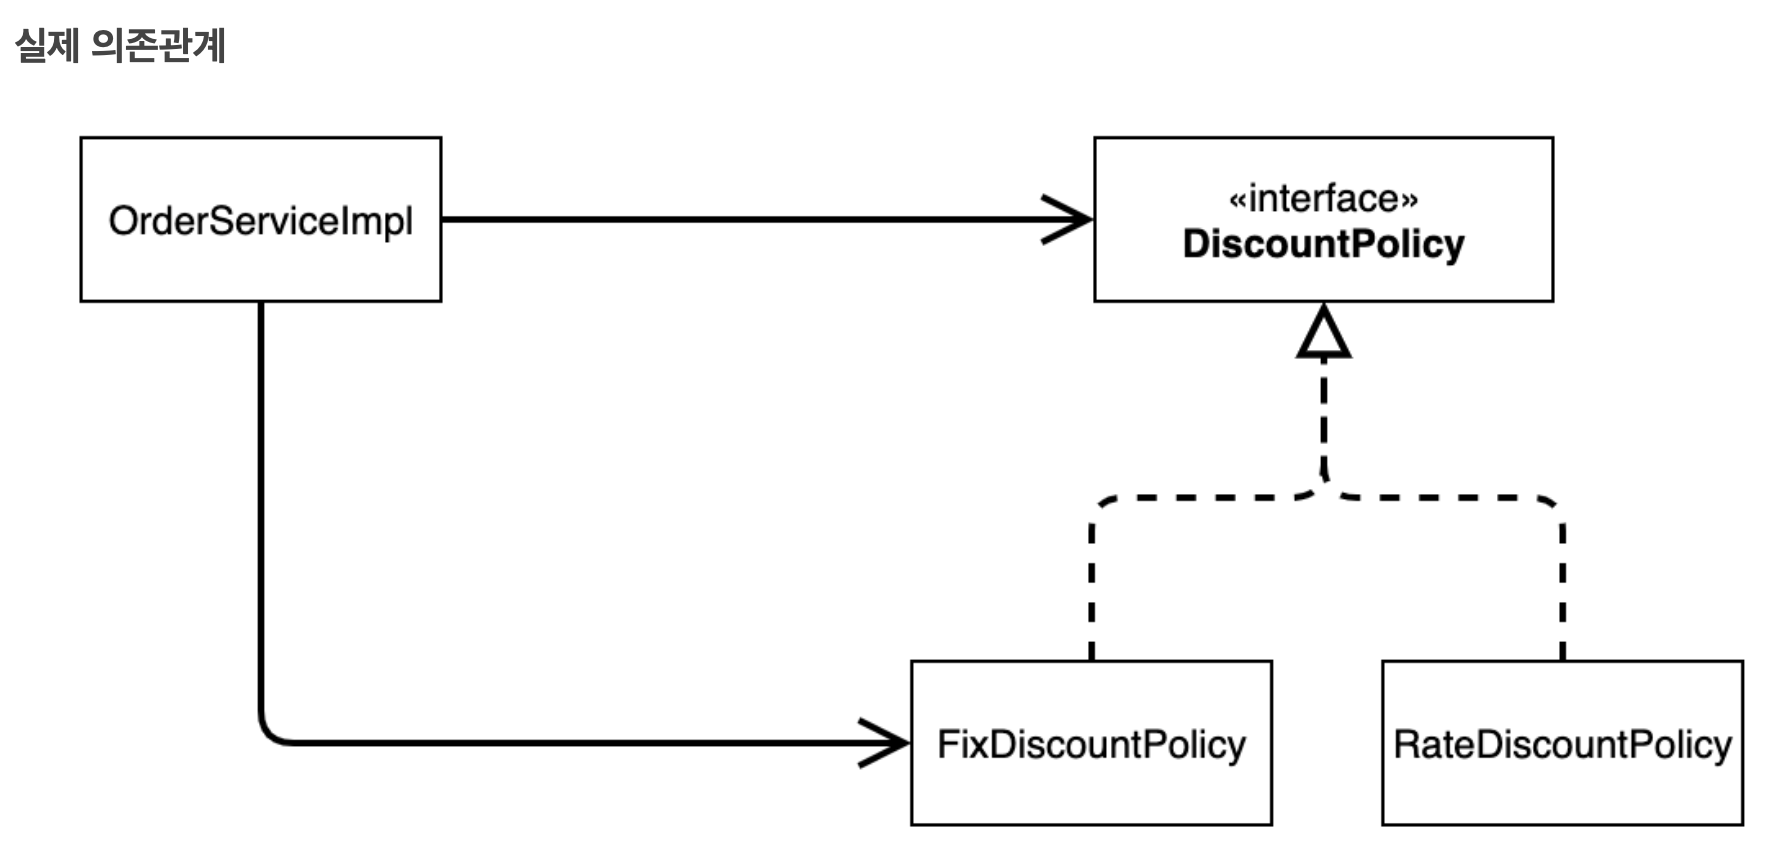
OrderServiceImpl에서는 DiscountPolicy 뿐만 아니라 FixDiscountPolicy인 구체 클래스도 함께 의존하고 있다. → DIP 위반
#DIP(Dependency Inversion Principle) : 저수준 모듈이 고수준 모듈에 의존하게 되는 것
맞추기 위해서는 추상에만 의존하도록 변경해야함 (인터페이스에 의존)
기존의 이 코드에서 아래처럼 바꿔주어야 함

➜ 인터페이스에만 의존하도록 설계와 코드를 변경함
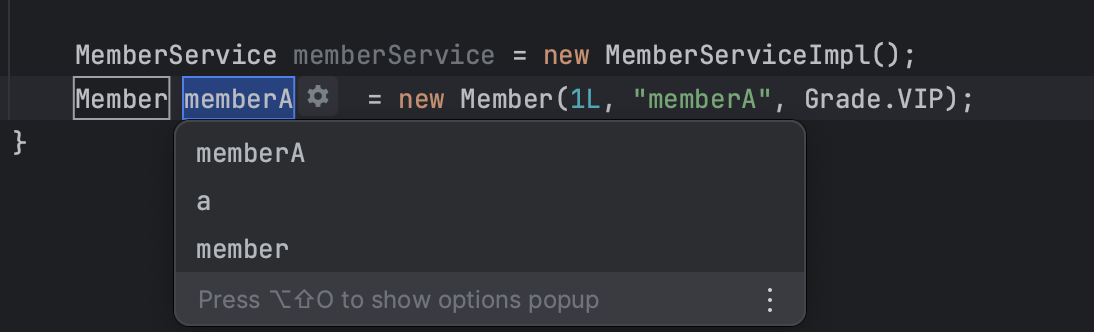
✔︎ 관심사의 분리

AppConfig는 생성한 객체 인스턴스의 참조(레퍼런스)를 생성자를 통해서 주입(연결)해준다.
- 설계 변경으로 `MemberServiceImpl` 은 `MemoryMemberRepository` 를 의존하지 않는다! 단지 `MemberRepository` 인터페이스만 의존한다.
- MemberServiceImpl` 입장에서 생성자를 통해 어떤 구현 객체가 들어올지(주입될지)는 알 수 없다.
- MemberServiceImpl` 의 생성자를 통해서 어떤 구현 객체를 주입할지는 오직 외부( `AppConfig` )에서 결정된 다.
- MemberServiceImpl` 은 이제부터 **의존관계에 대한 고민은 외부**에 맡기고 **실행에만 집중**하면 된다.
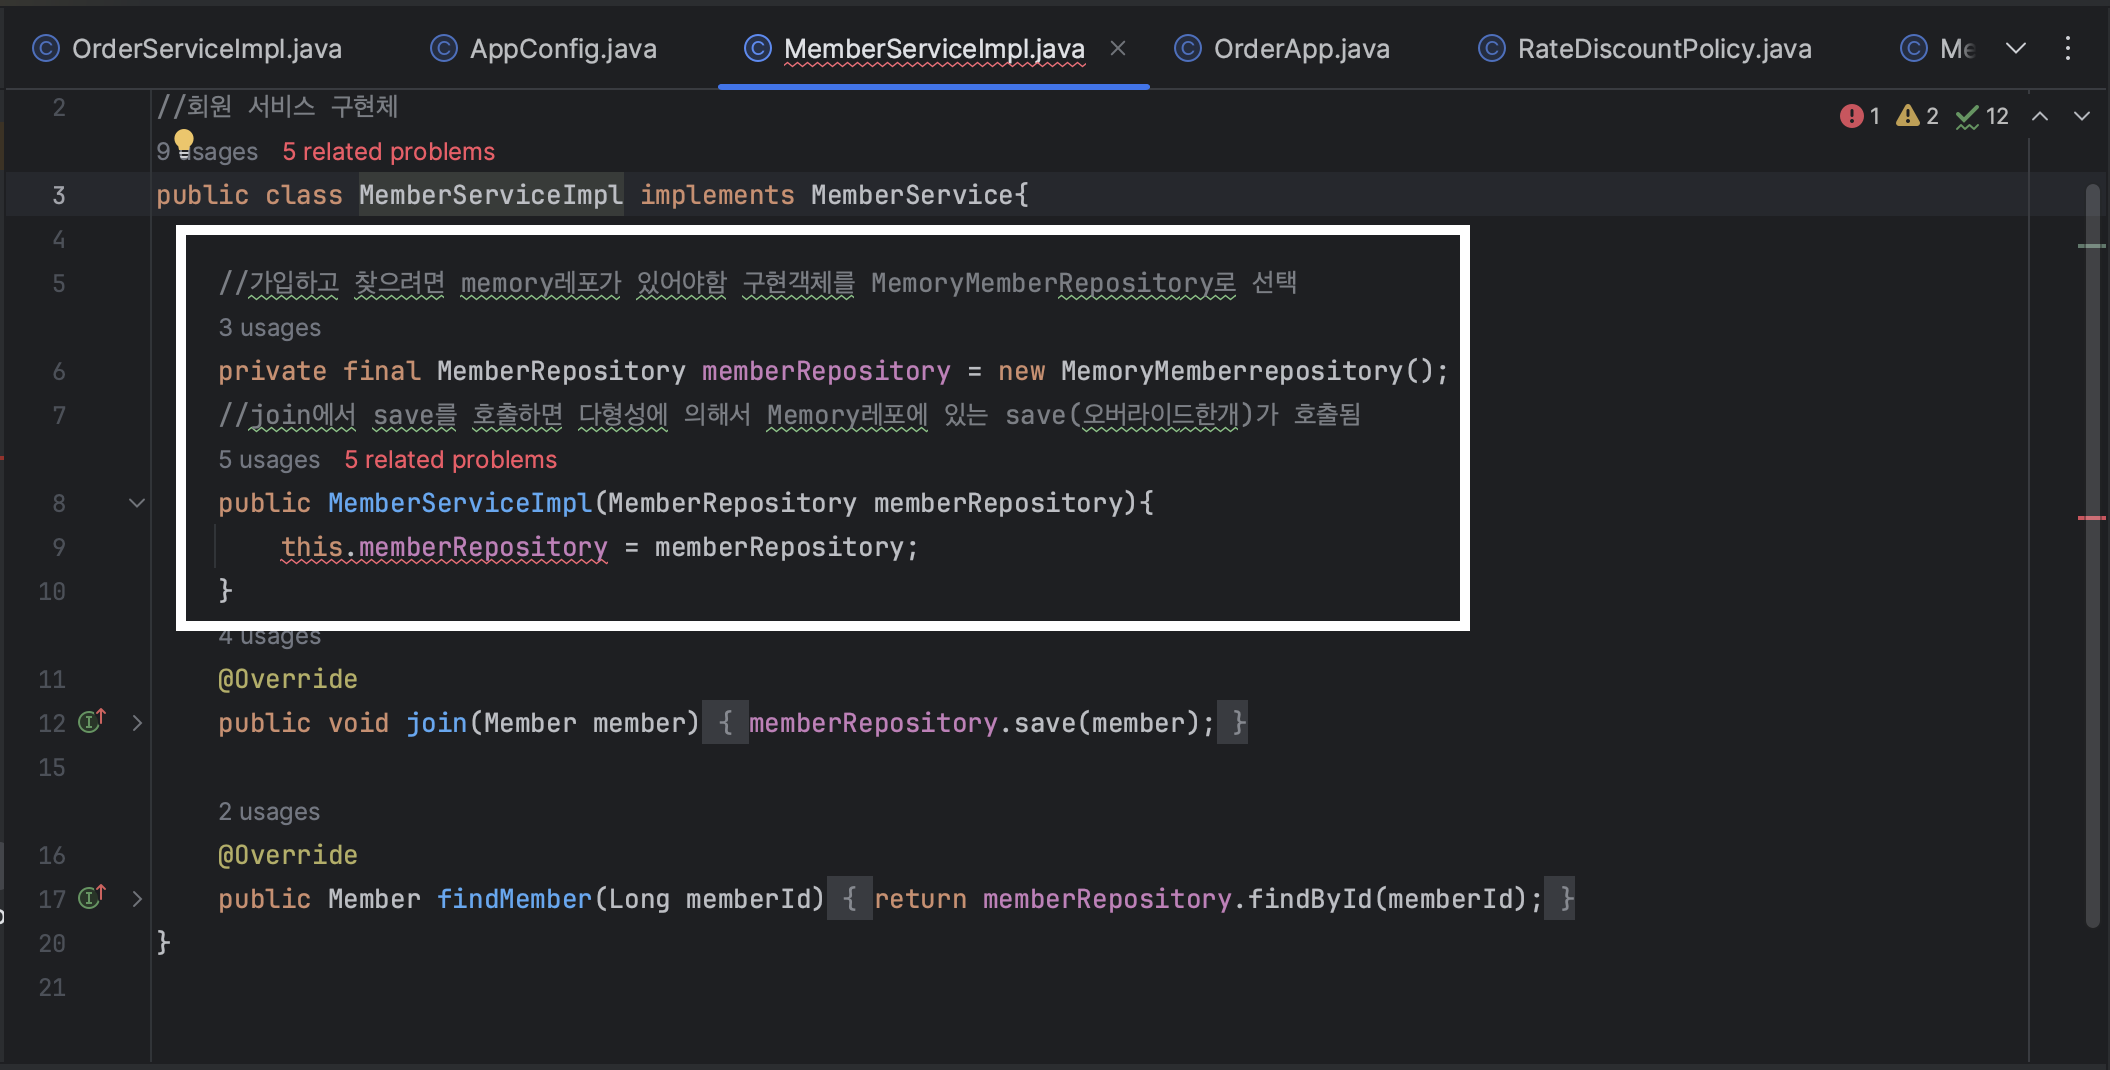
core.MemberServiceImpl 기존의 이코드에서
package hello.core.member;
//회원 서비스 구현체
public class MemberServiceImpl implements MemberService{

    //가입하고 찾으려면 memory레포가 있어야함 구현객체를 MemoryMemberRepository로 선택
    private final MemberRepository memberRepository = new MemoryMemberrepository(); //2. 여기서 할당이 됨
    //join에서 save를 호출하면 다형성에 의해서 Memory레포에 있는 save(오버라이드한개)가 호출됨
    public MemberServiceImpl(MemberRepository memberRepository){    //1. 여기서 memorymemberReposiotry가 들어와서
        this.memberRepository = memberRepository;
    }
    @Override
    public void join(Member member) {
        memberRepository.save(member);
    }

    @Override
    public Member findMember(Long memberId) {
        return memberRepository.findById(memberId);
    }
}
이걸로 변경
package hello.core.member;
//회원 서비스 구현체
public class MemberServiceImpl implements MemberService{

    //가입하고 찾으려면 memory레포가 있어야함 구현객체를 MemoryMemberRepository로 선택
    private final MemberRepository memberRepository;
    //join에서 save를 호출하면 다형성에 의해서 Memory레포에 있는 save(오버라이드한개)가 호출됨
    public MemberServiceImpl(MemberRepository memberRepository){    //1. 여기서 memorymemberReposiotry가 들어와서
        this.memberRepository = memberRepository;
    }
    @Override
    public void join(Member member) {
        memberRepository.save(member);
    }

    @Override
    public Member findMember(Long memberId) {
        return memberRepository.findById(memberId);
    }
}
✔︎AppConfig 리팩터링
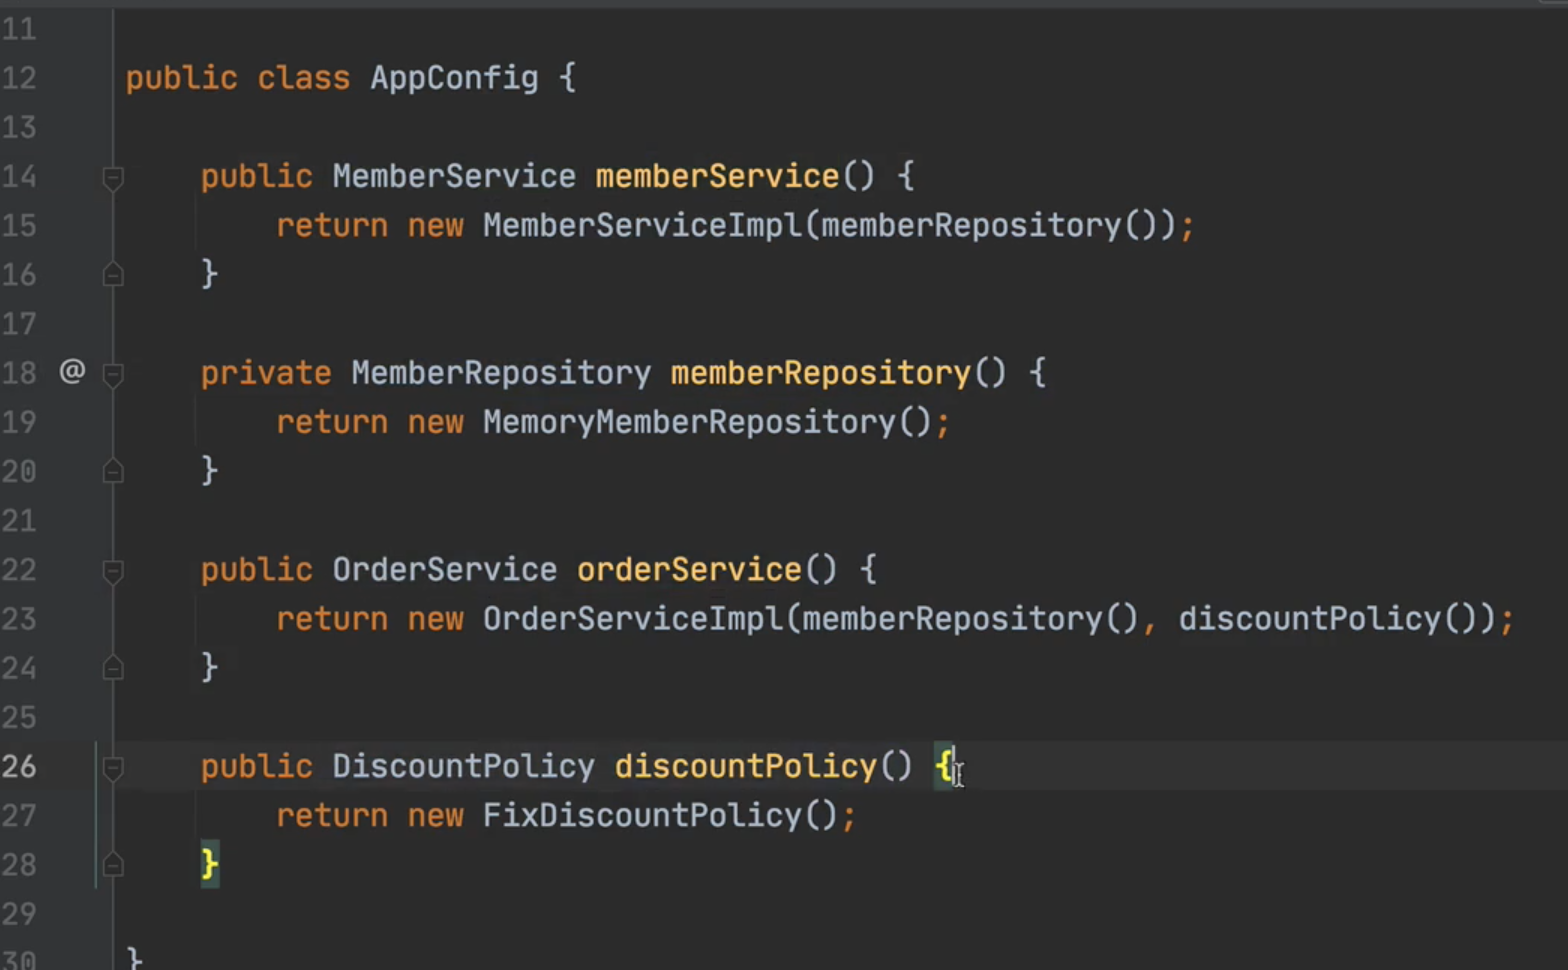
→ 할인 정책을 변경해도 Appconfig 변경만으로 적용가능
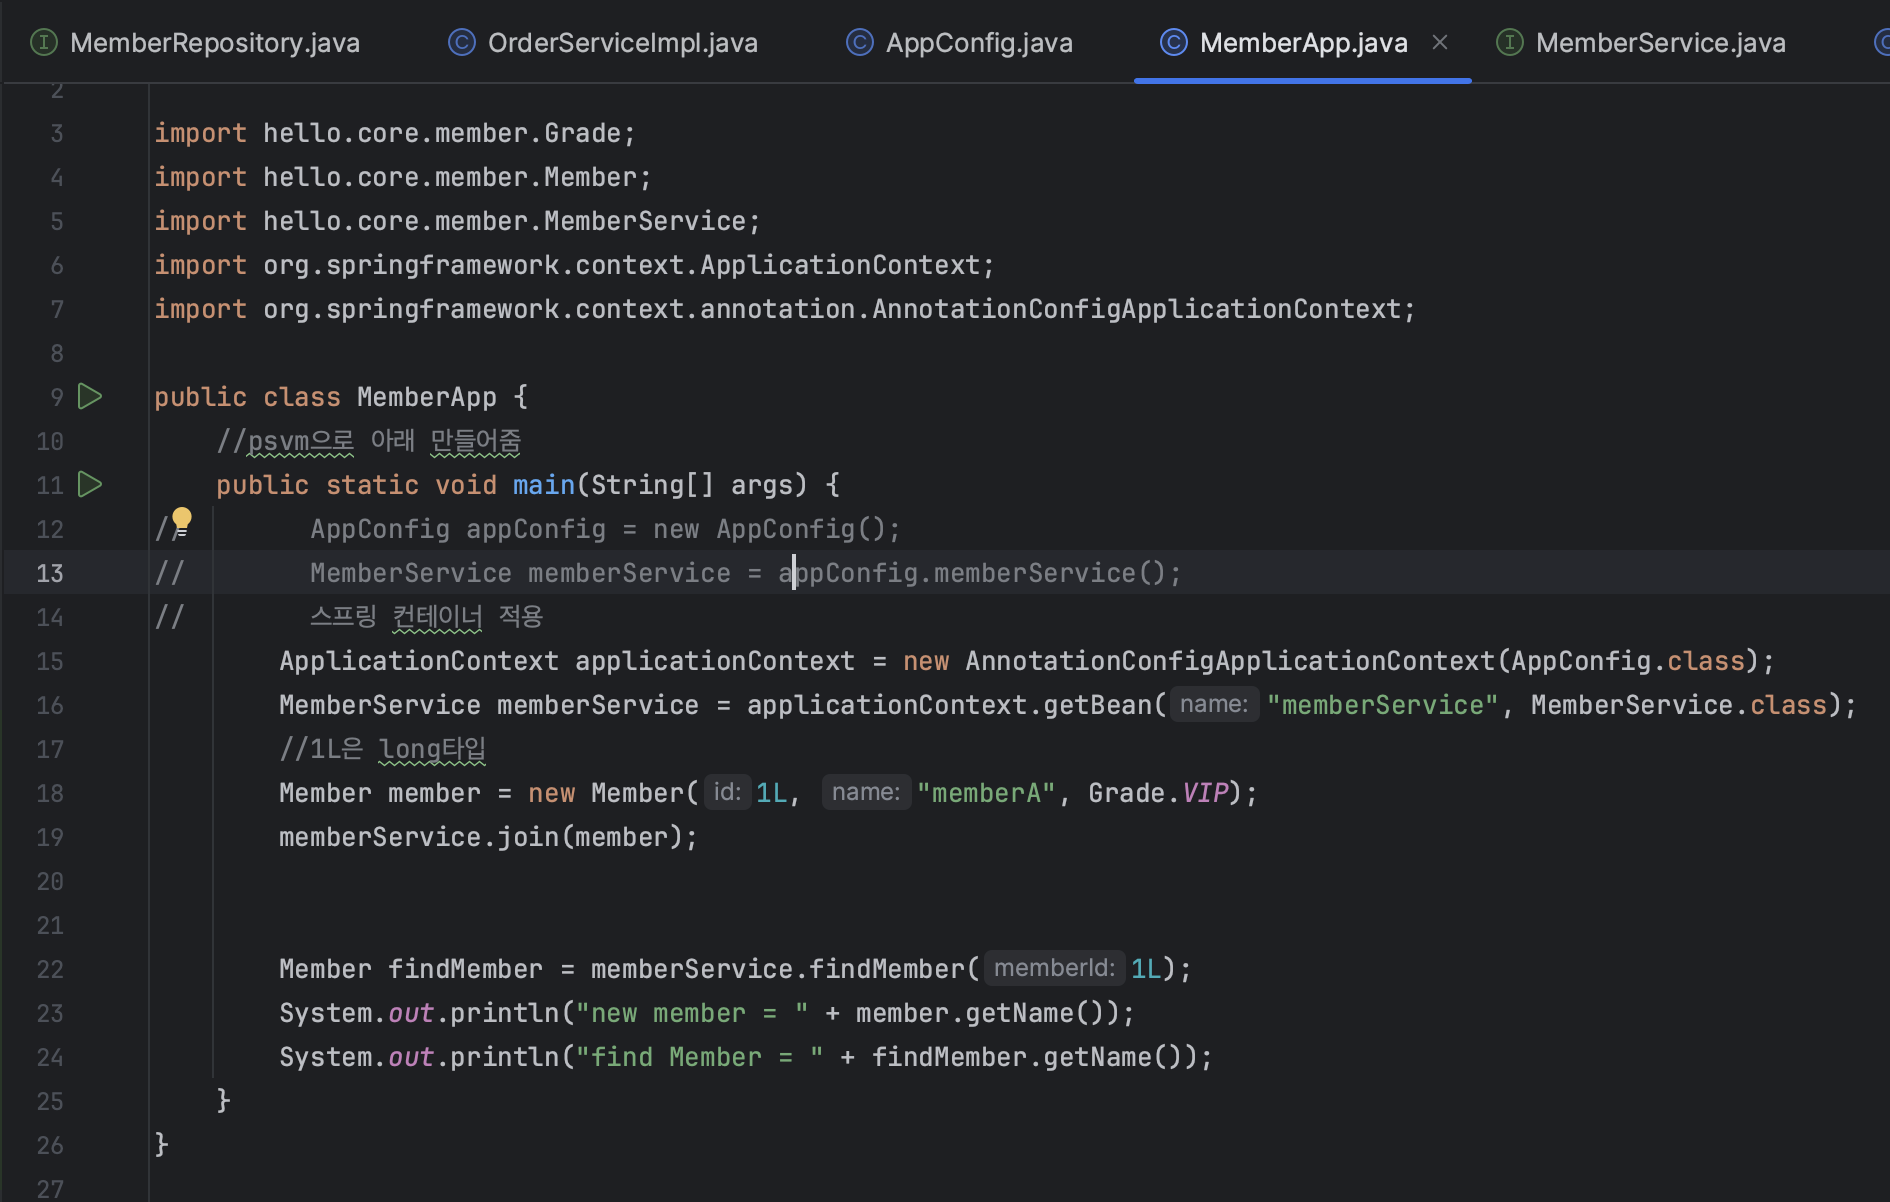
스프링 컨테이너 적용
MemberApp.java
OrderApp.java
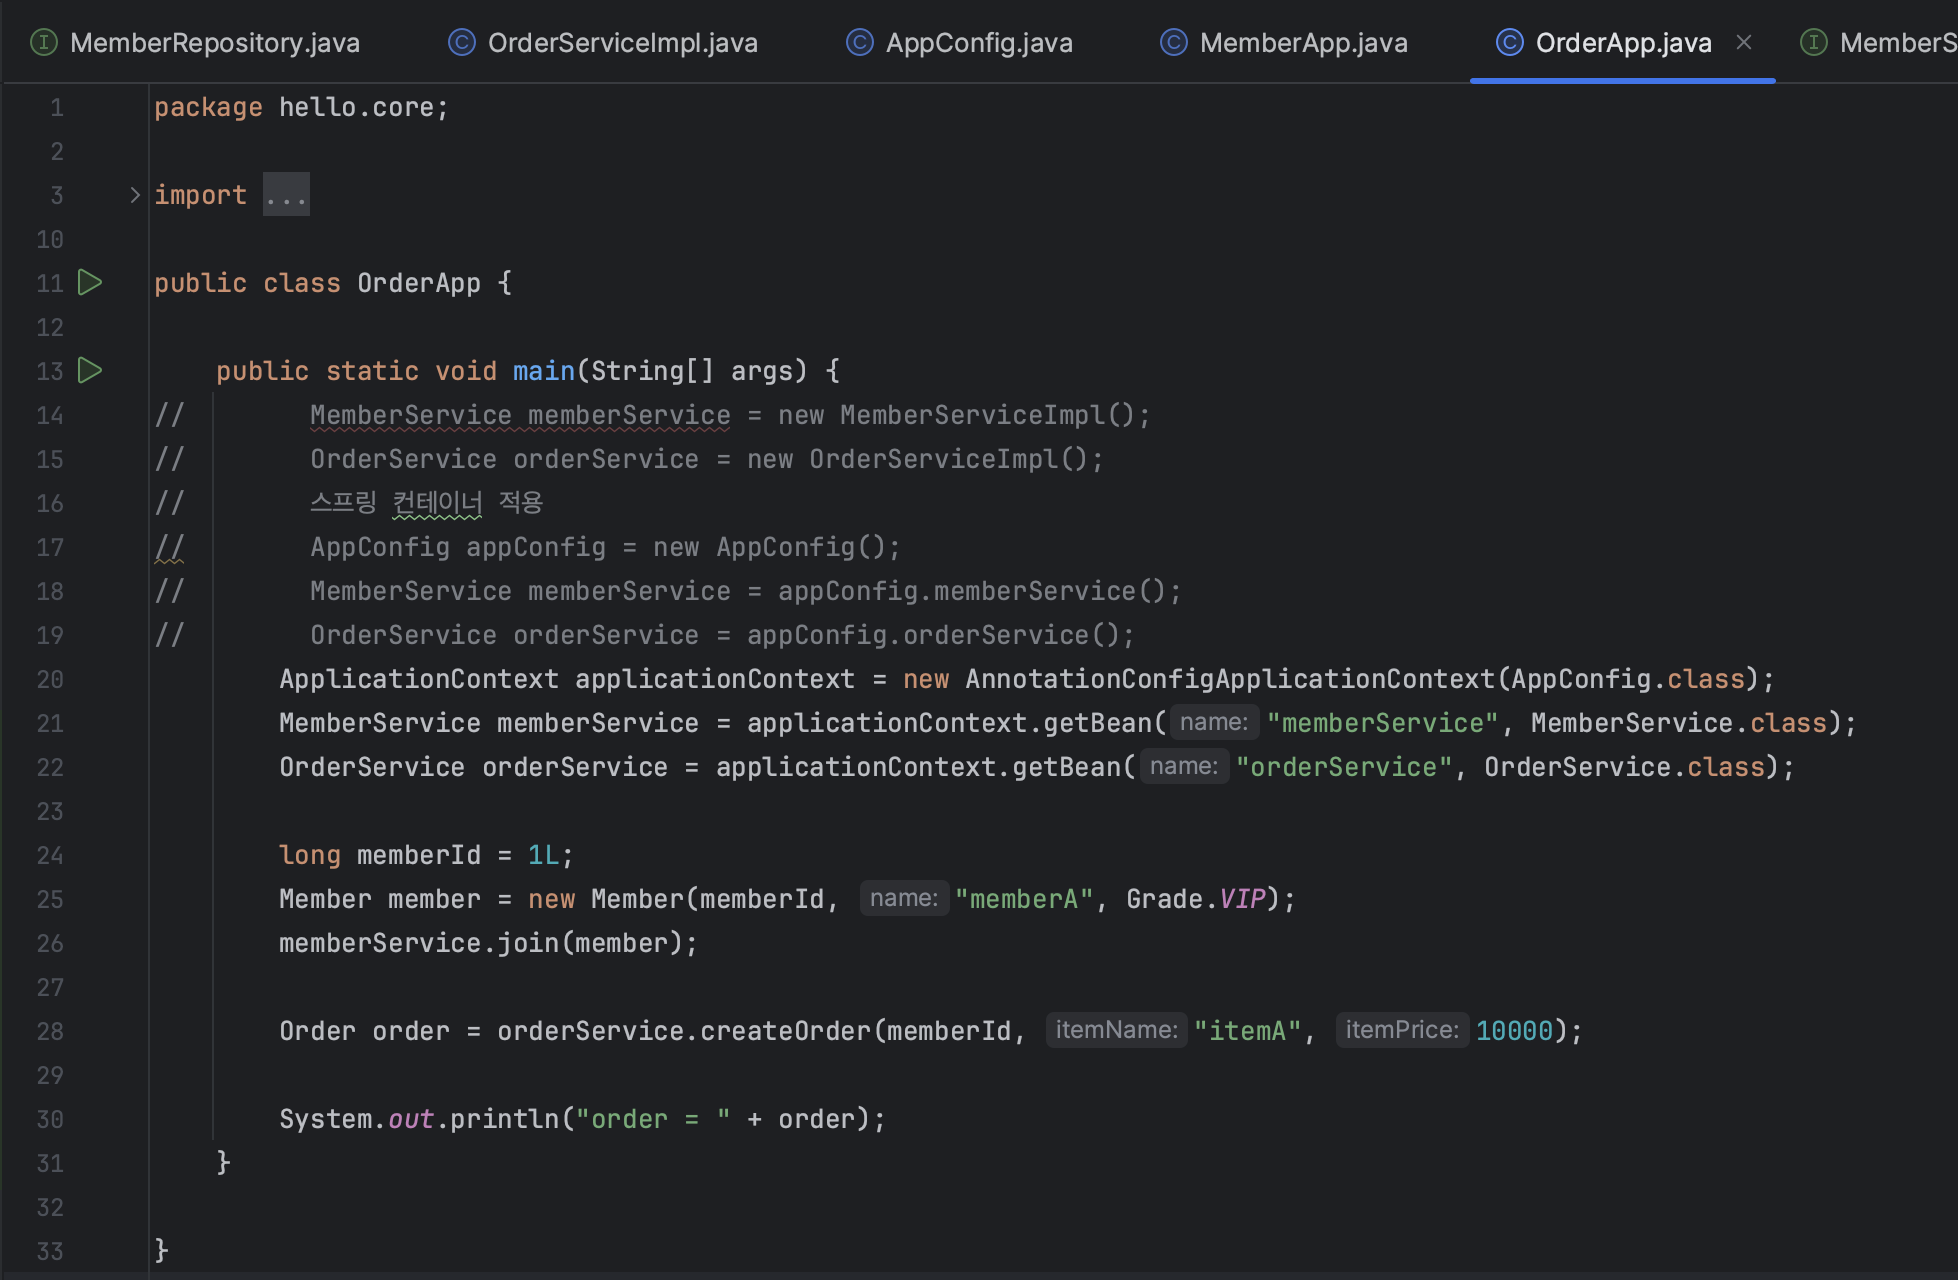
AppConfig.java

| [스프링] 싱글톤 컨테이너 (0) | 2024.04.26 |
|---|---|
| [스프링] 스프링 컨테이너와 스프링 빈 (0) | 2024.04.25 |
| [스프링] 스프링 핵심 원리 - 기본편 1 (0) | 2023.11.27 |
| [스프링] start (0) | 2023.11.06 |

인프런 스프링 핵심 원리 -기본편 강의 샀다. 시작한다.


| [스프링] 싱글톤 컨테이너 (0) | 2024.04.26 |
|---|---|
| [스프링] 스프링 컨테이너와 스프링 빈 (0) | 2024.04.25 |
| [스프링] 스프링 핵심 원리 - 기본편 2 (0) | 2023.11.27 |
| [스프링] start (0) | 2023.11.06 |
스프링 부트 스타터로 프로젝트 생성

-spring boot 설정할 때 뒤에 snapshot이 붙은 것들은 아직 정식 버전이 아니기 때문에 붙지 않은 다른 것들로 선택
IntelliJ에서 만든 프로젝트 염
- test 코드 : 요즘 개발과정에서 test가 가장 중요하다고함
- build.gradle : 스프링부트 나오면서부터 개발자친화적으로 설정파일까지 제공해줌
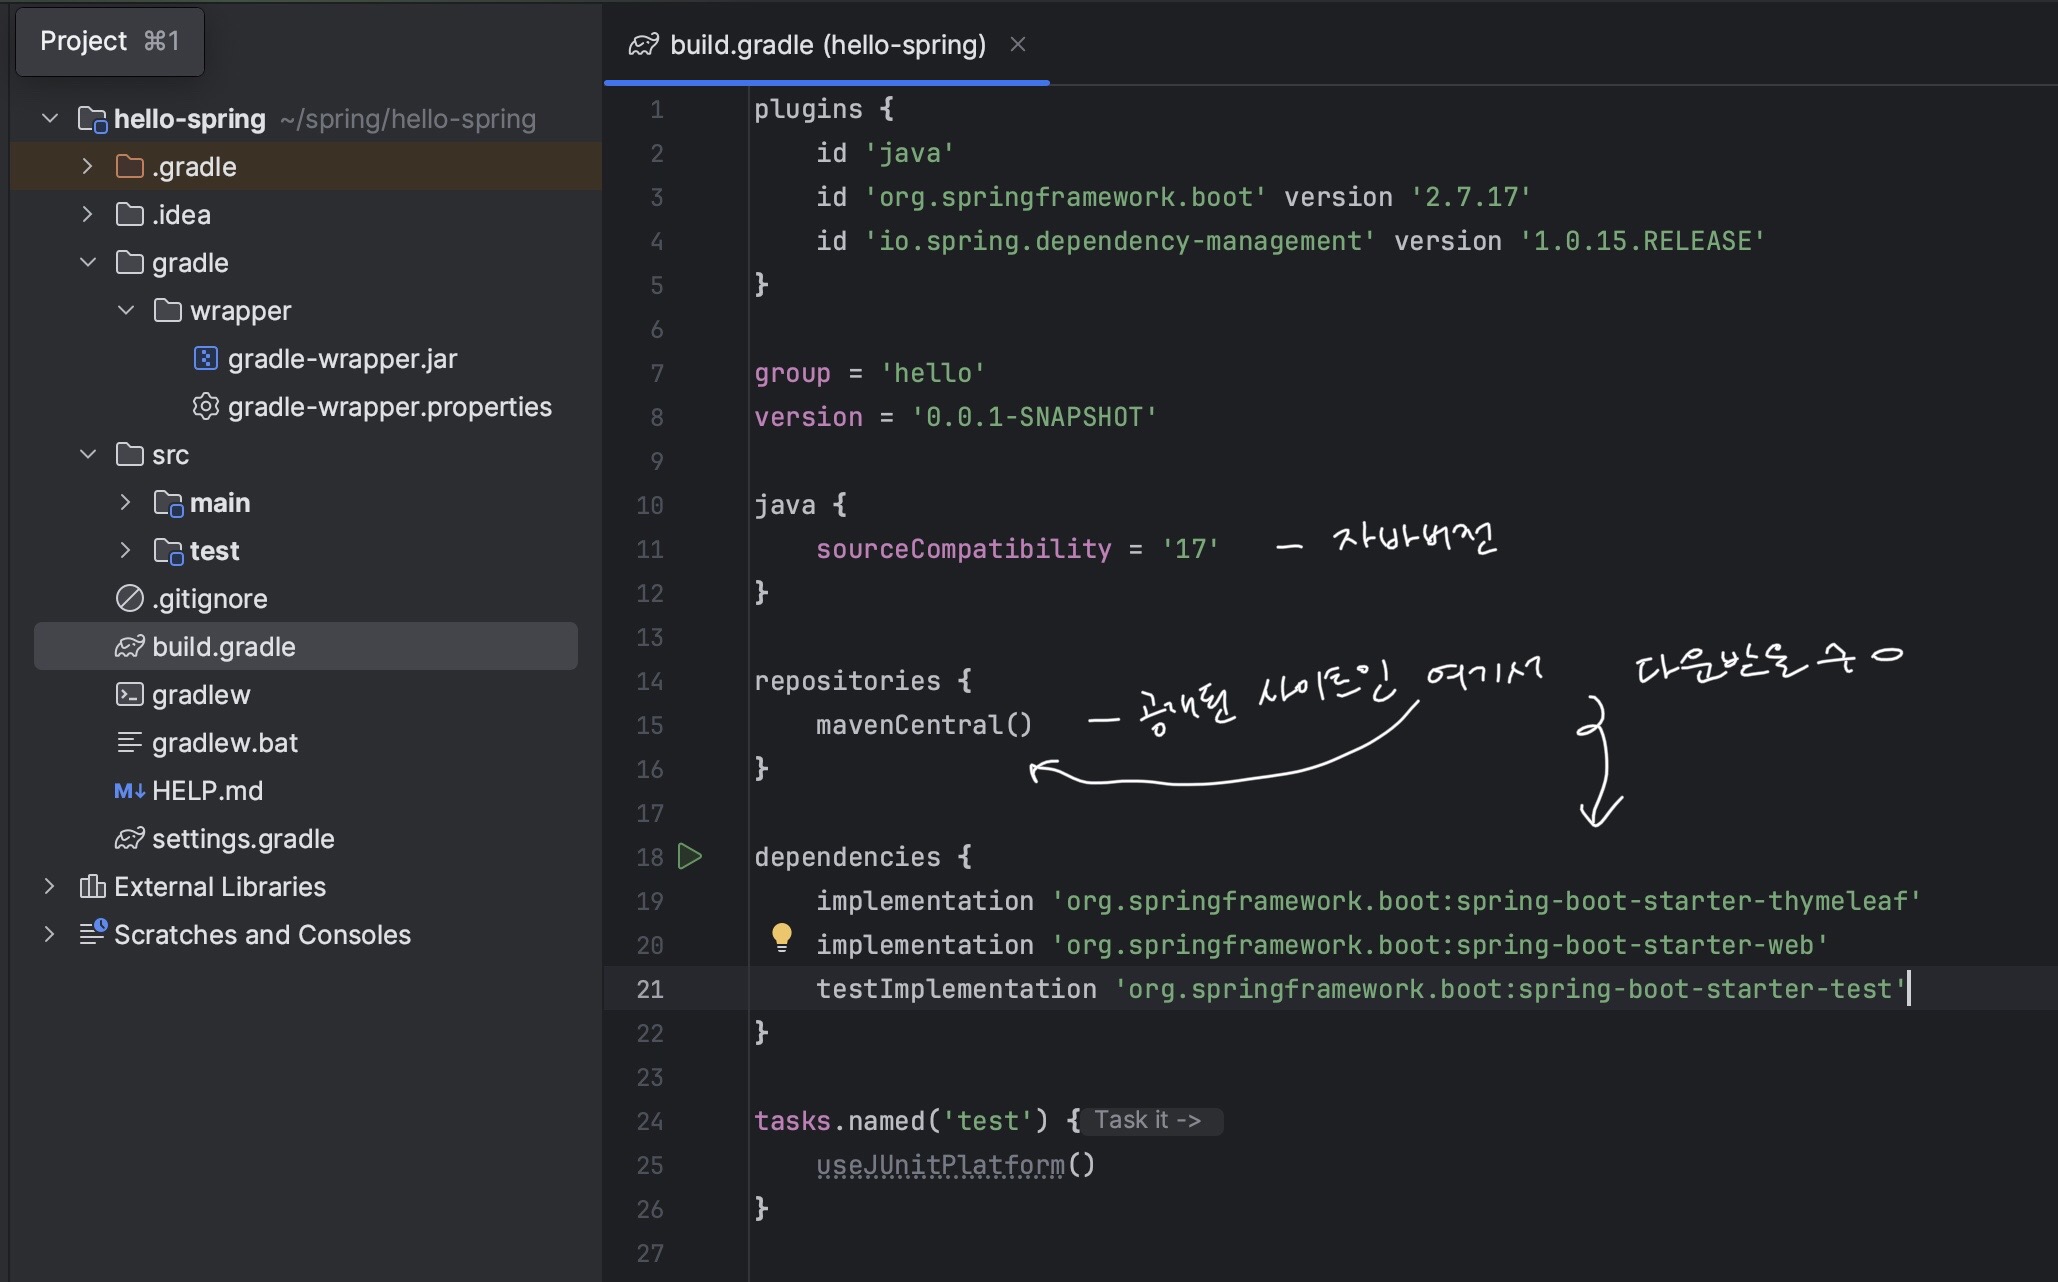


External Library 내에 수많은 빌드 툴들이 존재 // 서로 의존에 필요해서

스프링부트는 매우 포괄적이기 때문에 공식문서를 잘 활용할 줄 알아야함
spring.io 에서 사용기능들 검색 활용이 중요
템플릿 엔진 [thymeleaf]
서버 재시작없이 수정사항 바로 반영되게끔 하는 spring-boot-devtools 라이브러리 추가
- build.gradle의 dependencies안에 의존성 추가
developmentOnly 'org.sppringframework.boot:spring-boot-devtools'
- main-resources-application.properties에 application.properties에 사용 여부 추가
(필수적인 작업은 아니나 사용할 땐 true, 아닐 땐 false로 바꿈으로서 유용함)
spring.devtools.livereload.enabled=true
spring.devtools.restart.enabled=true
- intelliJ 환경설정


- 확장프로그램 설치
https://chrome.google.com/webstore/detail/livereload%20%20/ciehpookapcdlakedibajeccomagbfab
1. IntellJ 종료후 터미널 접속
2. 프로젝트 경로로 접속
$ cd spring
$ cd hello-spring
3. build
$ ./gradlew build이걸로 미해결
https://veneas.tistory.com/entry/IntelliJ-Execution-failed-for-task-compileJava
build.gradle 파일의 org.springframework.boot의 버전을 2.4.0으로 바꿔줬더니 새로운 에러가 발생
4.
$ cd build
$ ls
$ cd libs
$ ls -arlth //아마도 종료
✔︎MVC : Model, View, Controller
최근에는 Controller와 View를 쪼개서 진행함
<Controller>
main-java-hello-hellospring-controller-HelloController.java
package hello.hellospring.controller;

import org.springframework.stereotype.Controller;
import org.springframework.ui.Model;
import org.springframework.web.bind.annotation.GetMapping;
import org.springframework.web.bind.annotation.RequestParam;

@Controller
public class HelloController {
    @GetMapping("hello")    // url매칭됨
    public String hello(Model model){
        model.addAttribute("data", "hi!!");  // key는 data 값은 hello!!
        return "hello";  //hello.html을 return해라 return을 하게 되면 resources-templates에서 파일을 찾음
    }
    @GetMapping("hello-mvc")
    public String helloMvc(@RequestParam("name") String name, Model model) {
        model.addAttribute("name", name);
        return "hello-template";
    }
}
<View>
resource-templates-hello-template.html
<html xmlns:th="http://www.thymeleaf.org">
<body>
<p th:text="'hello '+ ${name}">hello! empty</p>
</body>
</html>
http://localhost:8080/hello-mvc?name=spring!!!!!!!!!!
위에 접속했을 때


@ResponseBody 문자반환 (아래서 세번째줄부터 추가)
package hello.hellospring.controller;

import org.springframework.stereotype.Controller;
import org.springframework.ui.Model;
import org.springframework.web.bind.annotation.GetMapping;
import org.springframework.web.bind.annotation.RequestParam;
import org.springframework.web.bind.annotation.ResponseBody;

@Controller
public class HelloController {
    @GetMapping("hello")    // url매칭됨
    public String hello(Model model){
        model.addAttribute("data", "hi!!");  // key는 data 값은 hello!!
        return "hello";  //hello.html을 return해라 return을 하게 되면 resources-templates에서 파일을 찾음
    }
    @GetMapping("hello-mvc")
    public String helloMvc(@RequestParam("name") String name, Model model) {
        model.addAttribute("name", name);
        return "hello-template";
    }
    @GetMapping("hello-string")
    @ResponseBody
    public String helloString(@RequestParam("name") String name) {
        return "hello " + name;
    }
}
command+N 단축키로 만듬


코드 치다가 command+shift+enter 치면 코드 완성시켜줌

http://localhost:8080/hello-api?name=spring!!!!!!!!!!
이 경로 접속 시 json 형태로 출력이 되는것을 확인할 수 있음

api 동작방식

- localhost:8080/hello-api 접속 시 스프링으로 넘어가서 @ResponseBody를 읽게 되면 HttpMessageConverter를 이용해서 Json 스타일로 바꾼 내용 그대로를 반환한다.
- 객체를 받게 되면 json 방식으로 데이터를 만들어서 http 응답을 한다.
- viewResolver 대신 HttpMessageConverter가 동작함
hello-hello-spring 에 domain이라는 폴더 생성
| [스프링] 싱글톤 컨테이너 (0) | 2024.04.26 |
|---|---|
| [스프링] 스프링 컨테이너와 스프링 빈 (0) | 2024.04.25 |
| [스프링] 스프링 핵심 원리 - 기본편 2 (0) | 2023.11.27 |
| [스프링] 스프링 핵심 원리 - 기본편 1 (0) | 2023.11.27 |